Day 4: Polonaise
The final day in the 4 day Polonaise Project!
The night before the skirt had been roughly pleated and attached to the bodice. Today's tasks consisted of refining the pleats and attaching the skirt to the bodice. Luckily I had plenty of cat help from Barley Mow

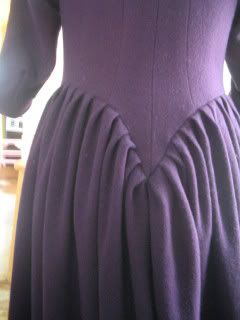
To start I based the pleats in place to eliminate shifting as the bodice & skirt came together. Next I finished the top 4 inches of the front facing with a 1" wide doubled hem, whip stitched closed. Next I worked from the front to as close to the center dip as I could. The skirt starts about 4" from the center of my hip, right at about the same place that my petticoats overlap. This is flattering, leaves enough that I can still get into my pockets and leaves enough of the front V as well.
I also left about 2" extra on either side of the very bottom of the bodice V for a final inset box pleat. This wasn't 100% intentional but it was easier to leave the pleat until the rest of the skirt was attached. Then the center back pleat is set in by hand, the extra fabric whip stitched in line with the other pleats to keep everything tidy.

For the front bottom of the bodice, I folded the seam allowance for both the lining & the outer in on each other and whip stitched them in place with the smallest stitches I could stand.
Finally I folded the front facing of the bodice over and whip stitched it into place. The original pattern suggests using hook and eyes along the center front but I nixed that idea. To begin with, I like the adjustability of pinning my bodice closed. Second it eliminated needing to make the bodice front "straight" or in my case, not straight. I found when I pin the front the top over laps significantly more than bottom. Closing with hook and eyes would mean I have to make the front edge just match. Entirely too much work in my mind when I could just let it over lap how ever it needs too and pin in place.
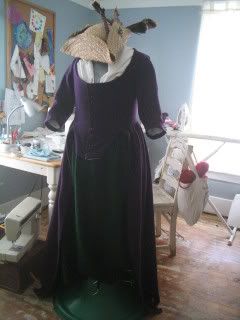
The final gown on Sticky, with my green wool petticoat & a simple silk neckerchief (& J's straw tricorn where I hide all the feathers out of cat reach)

The night before the skirt had been roughly pleated and attached to the bodice. Today's tasks consisted of refining the pleats and attaching the skirt to the bodice. Luckily I had plenty of cat help from Barley Mow

To start I based the pleats in place to eliminate shifting as the bodice & skirt came together. Next I finished the top 4 inches of the front facing with a 1" wide doubled hem, whip stitched closed. Next I worked from the front to as close to the center dip as I could. The skirt starts about 4" from the center of my hip, right at about the same place that my petticoats overlap. This is flattering, leaves enough that I can still get into my pockets and leaves enough of the front V as well.
I also left about 2" extra on either side of the very bottom of the bodice V for a final inset box pleat. This wasn't 100% intentional but it was easier to leave the pleat until the rest of the skirt was attached. Then the center back pleat is set in by hand, the extra fabric whip stitched in line with the other pleats to keep everything tidy.

For the front bottom of the bodice, I folded the seam allowance for both the lining & the outer in on each other and whip stitched them in place with the smallest stitches I could stand.
Finally I folded the front facing of the bodice over and whip stitched it into place. The original pattern suggests using hook and eyes along the center front but I nixed that idea. To begin with, I like the adjustability of pinning my bodice closed. Second it eliminated needing to make the bodice front "straight" or in my case, not straight. I found when I pin the front the top over laps significantly more than bottom. Closing with hook and eyes would mean I have to make the front edge just match. Entirely too much work in my mind when I could just let it over lap how ever it needs too and pin in place.
The final gown on Sticky, with my green wool petticoat & a simple silk neckerchief (& J's straw tricorn where I hide all the feathers out of cat reach)

Labels: 18th Century, Tutorials, Women

0 Comments:
Post a Comment
<< Home