Slightly Obsessed

A long standing living history blog covering all eras with a special focus on clothing, food & social culture as well as first-person reenacting.

Name:
Location: Barrington, 2c79a7d7-8d84-e411-95ca-d4ae52b58f15, United States

Tuesday, September 10, 2013

Since Evolution Became Fashionable

Or, the 5 year evolution of my 1550-1610 Flemish Market Woman's Impression.

There is a common feeling among new reenactors that you must do everything Right Now, must have all the clothes, the accessories, the weapons. All of it & in no short order. While part of that feeling is understandable when falling in love with a new hobby like reenacting, it is often times not the best approach.

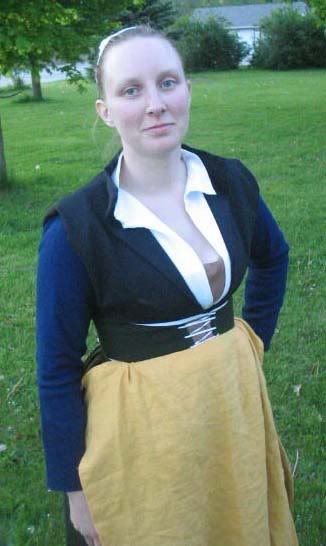
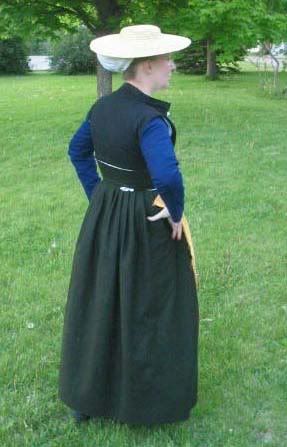
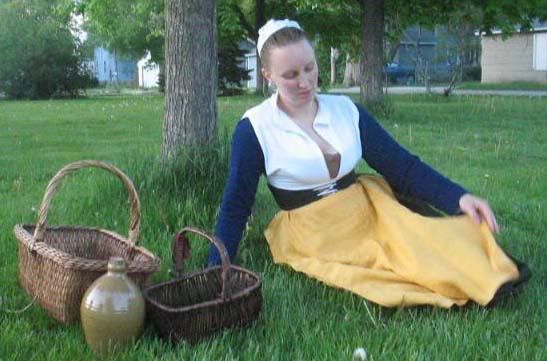
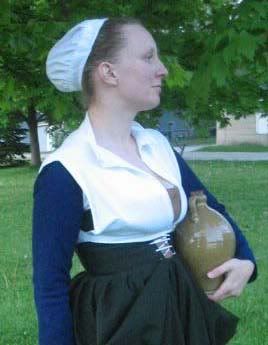
Flemish Market Woman v1.0 circa 2008
Reenacting is a time consuming, money devouring, all encompassing hobby. Really the only ways to go about fully developing a complete, historically accurate impression is either to be some kind of independently wealthy play-boy who really likes old stuff, or to take your time & allow the kit to grow & evolve with you.

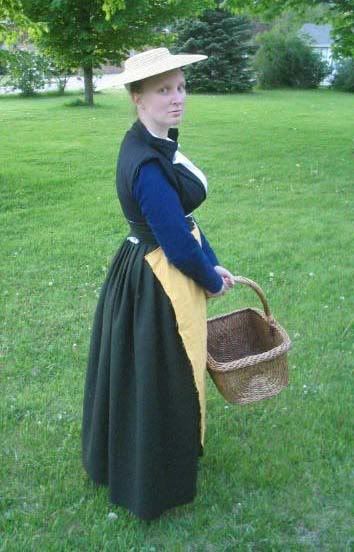
5 years ago, I set about making a Flemish Market Woman's outfit, not because I had any special plans for it to become a long term part of my reenacting hobby, but because my friend Kass, the force behind Reconstructing History, had some ideas about the cut of the clothes that I couldn't believe without seeing for myself. In the week before a local Renaissance Faire, I managed to put together a fairly accurate, comfortable outfit. But, because of the time constraint & the fact that I didn't intend to wear the outfit more than once or twice, I didn't really worry too much about making every accessory. My kit was bare bones, filled in with a few choice pieces (petticoat, shift, stockings & shoes) borrowed from my 18th century wardrobe. I even went so far as to borrow my 18th century straw hat & scrounged all the baskets, pottery & containers I could find in all my other reenacting periods just to fill out the impression without having to do any new purchases.

Flemish Market Woman v1.0 circa 2008
That is where my Flemish Market Woman sat until 2012. Sure I would wear it every year to the local Renaissance Faire or winter trade show, but I never needed to move beyond that very simple, half borrowed kit. That was until some friends invited me to the Bristol Renaissance Faire for a day of drinking & debauchery (mostly drinking).

Suddenly, I was seeing all the flaws in my quick costume! The pinned on sleeves were just a tad to short. I really needed the black partlet to help hold my bust at the right height. My old 17th century men's shoes were no where near what would have actually been worn at the time. Worse, some of the short-cuts I had taken to get the clothes wearable, were starting to actually damage that same wear-ability. Most notable was the constant poking of the lace through the front of the kirtle. Sure it meant that I didn't have to sew lacing rings or eyelets at first, but the more I wore it, the more those holes tore the fabric. Clearly it was time to consider up grading my Flemish Market Woman kit.

Flemish Market Woman v2.0 circa 2012
First up were the shoes, I had a pair of wooden shoes I had purchased on a whim in Holland, MI several years earlier. While I can't definitively say that Flemish Women wore these shoes, their feet don't appear in images all that often or clearly, there was a pair much like mine in Pieter Aertsen's "The Egg Dance" painting from 1557. Since they were already in my wardrobe, & frankly not getting used for anything more than a door stop, I decided to use them. As it turns out, the public is awed by wooden shoes. I would get stopped no matter where I was going by multiple people with the usual question "Are those comfortable and/or hard to walk in".

Next up was a quick replacement pair of pin on sleeves. This time from some nice burgundy wool that was floating around in my fabric stash. I added a bit to the length to solve the too short problem of the previous pair & called them done.

The black partlet had been made during the first incarnation of the Flemish Market Woman's outfit, but for some reason, I hardly ever wore it. This time around I did, layering it over the plain white partlet. This gave me both just enough extra support in the bust but also brought the look even closer to that seen in many genre paintings from the era.

Flemish Market Woman v2.0 circa 2012
Now that all the old pieces were starting to look better, I decided to add a few more dedicated accessories & details to enhance the impression. Rather than wearing the bright yellow apron, I began tucking the front of the kirtle into my waist tie. This creates the very distinctive double layer look seen in paintings & quite frankly, is a lot cooler on hot summer days at Bristol than wearing the wool portion down all the time.

The last new addition to the second incarnation of the Flemish Market Woman was the "Rams Horns", or wired coif, worn on the head. This had seemed like such a daunting piece of clothing when I first made the outfit that I hadn't even considered making one. Boy was I wrong! It is nothing more than a rectangle of nice linen, with a wire sewn to the front edge. Of course, all that rolled hemming around the sides of the rectangle was enough to make me need a stiff drink, but once finished, ironed & starched, it was well worth the effort. The biggest obstacle was learning how to fold it up & over my head, pin it in place & get it to stay there. Nothing adding a few more straight pins doesn't fix!

Flemish Market Woman v2.5 circa 2013
It was about this time that I realized that for all the years I had worn this outfit, I still hadn't made the distinctive red jacket. It was that jacket that I really liked & seemed to gravitate towards in paintings. Yet it was the one piece missing from my own wardrobe. Of course, up until this year, every event that I wore the Flemish Market Woman outfit to had been during a hot, usually close to 90*, summer day. There was no real need for another layer of clothing. The Early Modern Muster of Arms in April was about to change that!

The Early Modern Muster of Arms (EMMA) would be my first over night camping experience with the Flemish Market Woman impression. Add to that the events focus on first person immersion, the potential for temperamental Midwestern spring weather & my growing interest in the slightly later 1580's era and you naturally get a reason to make that missing red jacket.

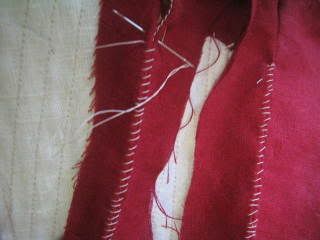
It was during a group sewing day that I finally pulled out the vivid red wool broadcloth I had purchased from Wm. Booth Draper just for this project. The jacket itself is more of an origami project than a sewing one, much like the matching kirtle. However, it was also extremely easy to make. I decided that this would be a good project to try out a new seam finishing technique that I had recently read about, the Elizabethan Seam. After all, I would be hand sewing the jacket anyway & there weren't any places where this seam treatment would interfere with pieces or shaping. The jacket is, after all, mostly a big folded rectangle with big rectangle sleeves.

Flemish Market Woman v2.9 circa 2013
Along with finally making the red jacket, I added a proper pair of leather shoes for the impression which were much safer while working in the kitchen than my usual wooden shoes. I also became determined that I had to have a new white partlet with a ruffled neck for EMMA. Little did I recall how much "fun" rolled hems are. Nor did I consider the sheer length of fabric that is needed to create a properly ruffled neck! As the event came & went, I was still hemming on that darned ruffle.

By the opening of Bristol in June of this year I had finally, after much swearing & a few very long movie marathons, finished the hemming, gathering, sewing, starching & shaping needed to finish the ruffled partlet. All that work for something that can barely be seen in a photograph! Oh well. It looks fantastic when worn & is spot on for what we see in paintings from the later portion of the 16th & early 17th centuries. The best part is now that I have made one, I don't have to consider making another for long, long time. Hopefully by then I will have forgotten just how much work it really takes to make one.

As you can see, over the years my Flemish Market Woman impression has grown & developed. It started out highly authentic, hand sewn from linen & wool & based on solid research into art of the time. But for as good as it was, there were still improvements to be made and pieces that could be added as time, interest & need allowed. This just goes to show that while it might be exciting to start reenacting a new time period (or at all), not everything has to happen at once. Heck, sometimes it takes years!
What's next for the Flemish Market Woman's impression you ask? Cloth hose, a nicer cap to wear under the coif, maybe another new pair of sleeves since I accidentally threw the burgundy pair in the dryer. Who knows. Just like with the evolution of life, sometimes the evolution of an impression just has to happen the way it happens.

Labels: , ,

Saturday, December 26, 2009

Any Road Will Get You There.

While looking through old photos this evening I discovered that I have not yet properly shared the photos of my 1943 outfit, constructed for the Midway Village World War II event this past September.

The dress is made from the above Simplicity pattern. I had the luck to pick this up earlier in the spring for only a few dollars. Very little alteration was needed from the patterns original sizing. Although future incarnations will likely have slightly larger, and more "dance-able" skirts. The entire outfit was constructed from stash material. The green & white are a linen-cotton blend that I collect for last minute clothing projects while the black rick-rack & cloth covered buttons were found my great-grandmother's vintage stash which I inherited last winter.

The dress is entirely constructed by machine, save attaching the buttons. I used a combination of sewing techniques from the Singer Illustrated Dressmaking Guide, copy-write 1941. This book is a great way to learn more traditional dress making techniques and maximize what can be done with just a straight & zig-zag stitch on your machine. All interior seams for the dress are overcast with a zig-zag stitch, the front buttonholes are functional as well as the "regulation placket" along the left side. I am especially pleased with the side placket, since I've never done one before this project. Typically if the front buttons, I will eliminate the placket out of laziness. This time I took the time to do it as historically as possible and get the perfect fit, which the placket emphasizes.

The matching bag was inspired by the second, unknown pattern. The design is just a double layered drawstring bag, the same design I use to make all my random pouches & gift bags. It was only natural that I also use it for this period outfit as well. The bag is constructed from dress scraps with a twisted cord, again from my great-grandmothers collection, as both the opener & shoulder strap. It is just big enough for all my important information including those much needed "papers"!

I accessorized with a while cotton snood; custom made by Arthelia's Attic on Etsy, vintage 1940's shoes; which hurt my feet but look too cute not to wear and the requisite white cardigan & bobby socks. The wonderful vintage suitcase was purchased at the event from one of the sutlers for a mere $15. It is now the home to all my 1940's clothing and accessories, with plenty of room for more!

For the photographs my trusty photographer A & I headed to our home town outside of Chicago. The intention was to take photos at the semi-vintage train depot in town. 35 degree weather, fog & sporadic rain derailed that plan, no pun intended. Instead we set up shop in front of my mother's vintage 1920's office building where I pretended to hail every car passing on the street.

Labels: ,

Tuesday, May 26, 2009

Stay the Course, Part 3

Or how to construct mid 18th century fully boned stays with a stomacher front.

Step Three: Finishing!

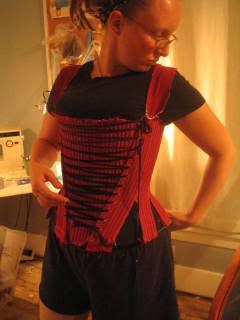
Please note: I did not take photographs while finishing the red stays with the stomacher front that the previous two sections of this tutorial use. In fact, I've never actually finished those stays & have been wearing them unlined for nearly a year (*blush). Instead we will use a pair of blue strapless, front & back lacing stays that I am constructing for a friend as our example throughout this stage of the tutorial. Luckily it doesn't matter what style of stays you are working with, the construction process is always pretty much the same.

Part 1: Binding

Materials:

Previously constructed stays using Parts One & Two.
Needle
Sturdy thread
Binding material. 3/4" strips of chamois leather, dutch linen tape or worsted wool tape are my preferred materials.

Lay binding right side to right side on stays edge. Binding only needs to cover around the very top and bottom of the lacing edges but you can bind around all edges if you want.

Stitch ~1/8" from binding edge using a back stitch for extra security.

Be careful stitching binding around interior curves of the tabs. This takes some fiddling to get just right. Swearing like a sailor while working on this step always works wonders for me.

Fold binding over to the interior leaving ~ 1/4" on the outside.

Whip stitch binding to the interior of the stays. This doesn't have to be perfect, pretty stitching, as it will be covered by the lining in the next step. Some coaxing might be needed around any curved edges and again in those dreaded inner curves of the tabs.

Take a break, your fingers probably hurt like crazy after sewing through all that leather! You can wear your new stays full time from this point. Lining is a nice finish though, keeps the interior more protected from sweat & body oils, provides a little more padding between you and the boning and when installed correctly, can easily be taken out for laundering or replacement without having to disassemble the entire pair of stays.

Part 2: Lining

Materials:

Previously constructed & bound stays, see above.
Previously customized stays pattern from Part 1 (optional)
Needle
Sturdy thread
Light to mid weight linen. This is a great place to use scraps.

Cut out the lining using your customized stays pattern as a guide or roughly trace the outline of the already constructed stays. Lining can be cut as 1 piece, or as several pieces corresponding to each piece of the stays. It's your choice, depending on how much extra work you want to do & how large your scraps of fabric are. The lining pieces don't even have to match, so use up those scraps!

Lay lining piece(s) on stays interior, wrong side to wrong side.

Turn in the edges so lining barely covers binding edge. If using separate lining pieces for each panel turn in all edges over lapping the seams just slightly. Don't forget to turn under the outer edge so your lacing holes remain accessible!

Pin liberally, adjust lining so it lays neatly & smoothly. Re-pin several times to get the lining just so. One can never use too many pins at this stage.

Whip stitch the lining into place along the binding edge, along the outer edge against the lacing holes & along where the lining panels join if necessary.

Use care when working around the interior of the tabs as that is the trickiest area. Trimming the lining into a "Y" shape at the top inner curve of the tabs can make tucking the lining to the inside easier but it is still going to be a fussy job.

Break out a bodkin & the champagne , your stays are finished!

Labels: , , ,

Sunday, March 29, 2009

Lucy Locket Lost Her Pocket

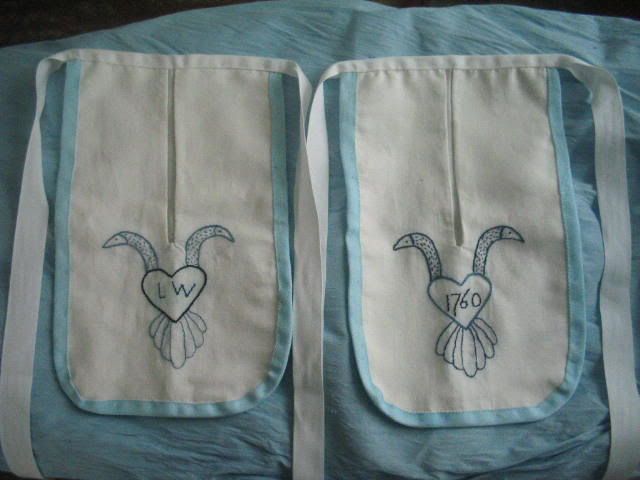
Or making a pair of embroidered pockets for a young girl.

I constructed this pair of pockets for my daughter L, who has grown enough in the past 3 years to need a larger pocket than the first I made. She also needs more room to carry her ever growing collection of 18th century trinkets.

The pockets are sized right between her original "small" pocket and the size I use for my own, measuring approximately 8" by 13". The front opening is 6 inches long, scientifically measured by having her lay her hand out on the pocket before cutting. The pockets themselves are made from 5oz linen, found in my scrap basket and dutch linen tape from Wm. Booth, Draper. The body binding was dyed using just a pinch of "baby blue" fiber reactive dye. Not a period choice, but what I had on hand and needed to use up anyway. Since my intention is for these pockets to last until L is a young woman I constructed them on 2 separate lengths of tape. This way they can tie both in the front & back, allowing the waistband to grow as she does.

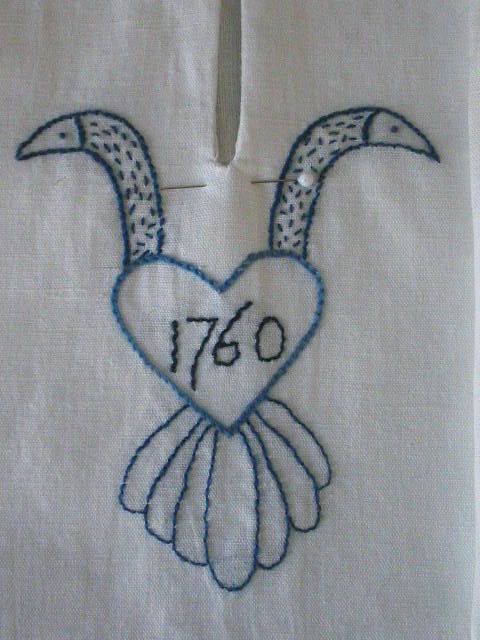
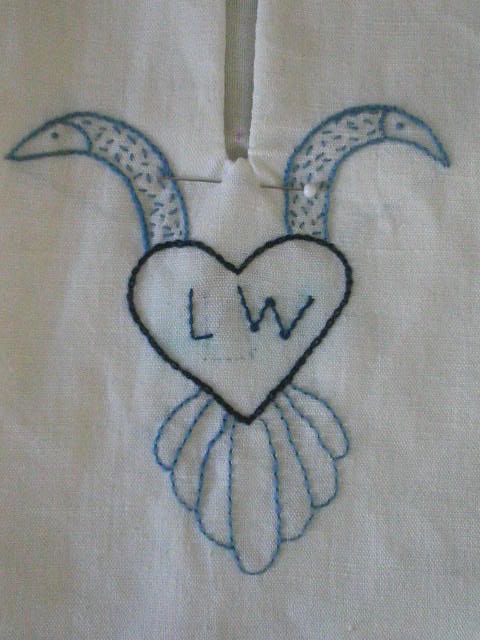
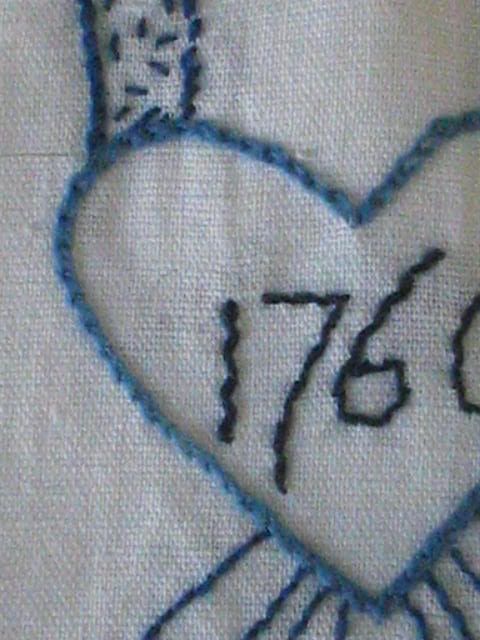
The embroidery is worked on 5oz linen from my endless collection of scraps using the beautiful woad dyed wool from Renaissance Dyeing (available through Reconstructing History). I used these as a practice pieces, since embroidery is still a rather new hobby of mine. The design consists of stem stitch, back stitch, french knots, seed stitch & wrapped running stitch. I varied the colors used but kept the stitches the same in each piece. The finished work is them layered with the working portion of the pocket and bound around the edges. This protects the back of the embroidery & makes the pockets a little more durable. For my readers who have seen just how filthy L gets at events, it's pretty clear why they need the extra layers!

The embroidery design is not a historical recreation, just "historically inspired". I saw a similar design sometime last year while searching for 18th century motifs. Sadly, I can not remember where I initially found it. It was most likely one of the endless pile of library books. My one complaint is that her initials are so hard to embroider! After several tries I finally had to settle for an only slightly lopsided "W".

Up next, my (entirely) hand sewn shift!

Labels: , , , ,

Sunday, January 18, 2009

Stay the Course Part 2

Or how to construct mid 18th century fully boned stays with a stomacher front.

Step two: the construction.

If you're just joining us, please refer to Part 1 for the fitting tutorial. Stays are custom items so the most important step is in the fitting. Take your time making the pattern perfect for your shape before proceeding. Trust me, it's well worth the effort.

materials

Custom pattern from Stay the Course, Part 1.

~1 yard chosen outer fabric. Linen or light weight wool are good choices, easy to come by & work well.

~2 yards inner lining fabric. Heavier weight linen works wonders as inner lining on stays

1 roll reed boning of your choice. I have used both 1/4" full round and 1/4" half oval reed. The full round is significantly stiffer but both work well. The choice will depend on how firm or flexible you want the final stays to be.

plenty of durable thread

ruler

disappearing marking pen or chalk

something good to watch on TV or a new audio book to listen to while you work.

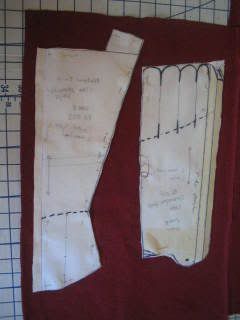
1. Cut 2 layers of piece out of inner lining leaving a generous seam allowance around all sides. If you are, however, working from random scraps as I am, then cutting directly on the pattern lines might be necessary. Do Not separate the tabs at this point, instead cut a box around them. You can almost see this in the photograph below. Leaving the tabs for later makes the entire piece so much easier to handle & insures that your boning channels don't land on a cut line.

2. Lay your lining & pattern pieces on top of your outer fabric. Cut out the outer pieces, leaving the same generous seam allowance around all sides, but especially around the sides that will be connected.

3. Measure the width of your reed and round up slightly. This make it both easier to slip the boning in each channel & accounts for any variation in each piece.
4. Measure & mark your boning channels. This is the point where I usually find myself running to the V & A or another museum site to look at every extant example of stays I can find. Take your cue from them as to which direction the channels on each piece of your stays should run. Straight at the center back and lacing strips yet with the direction of the tabs seems to be the most common arrangement I have seen.

5. Sew all those channels. If sewing by hand, a back stitch is the best bet as it is very sturdy. On the sewing machine a nice small stitch is preferred. When sewing the channels by machine it is faster not to cut the individual threads until the last line is reached. Instead, simply move the needle to the next line leaving a short tail in between each. These strings can all be pulled to the inside of the stays once each channel is sewn.

6. Fold the excess outer & lining fabric to the inside of the stays along the pattern line. Why did we leave that extra fabric? Two fold (sorry bad pun!). One, because it allows the material to shift while sewing the boning channels without disturbing the final construction and two, so that there is excess to "let out" should we need to expand the size of these in the future.

7. Place 2 pieces right side to right side, lining up the edge we just folded inside. With a sturdy thread whip stitch the two sections together. Stitches should be consistent and close together, these are the main seams after all. Many seamstresses will use this seam as the second side of the last boning channel. I prefer to sew the channels fully by machine & simply sew over that line when whip stitching sections together. Either way is just fine.

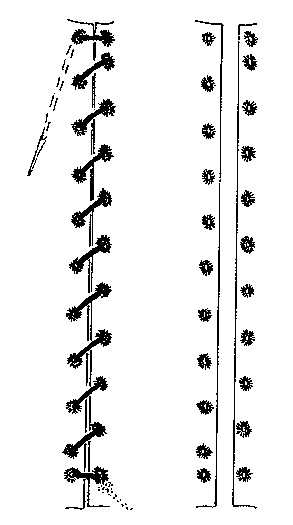
8. Mark your lacing holes. The back of these stays is laced using spiral lacing. The stomacher front is laced using 1 cord through parallel eyelets. On front & back lacing stays without a stomacher it's best to use spiral lacing on both pieces. I always check my marks at least twice, mentally lacing them up to check the arrangement & spacing.

9. Sew all those eyelets. You are allowed 1 complaint about how much of a pain they are to sew per hole. In this pair I stitched the eyelets twice, going around once with 5 or 6 stitches to hold the opening, then filling in the space on the second round. I have since been advised to use a doubled thread & only sew around the holes once. Surprisingly, I've found the double thread to make a much nicer, durable opening & it doesn't seem to take as long!
10. Decide where the best separations for your tabs are going to be, making sure that no tab as too few or too many boning channels. I generally try to have ~4-5 channels per tab. Mark & cut the tabs apart.

10. Stuff each channel with reed. I'm using 2 pieces of 1/4" half round reed back to back to create an oval reed. I've found this to be both supportive & flexible. I also discovered that very lightly waxing each piece of reed helps cut down on splintering & keeps it from catching on any stubs in the material as it's being pushed into the channels.

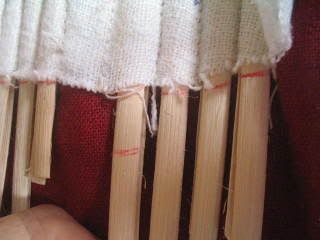
11. Trim each reed to fit leaving an ~1/4" space at the top & bottom of each channel. This gap will make adding the binding easier in the future. The photo is of how I mark the individual reeds. This method doesn't conserve much reed, but it's what I've found works best for me.

11A. (optional) If you are going to be wearing these stays prior to finishing the binding, as I did, it's best to sew along the top & bottom of the channel's to secure the reed. This little trick gave me the time to wear the stays before I found the time to fully finish them.

12. Remember that outer fabric that was folded to the inside? Now is the time to tack it in place with a loose whip stitch. This isn't mandatory, but it does make for a nicer inside. Just try not to stab yourself & bleed all over the stays. Ouch!

13. Repeat sewing & stuffing the boning channels for the stomacher front. The boning can either run vertical or connect in a center "V", which is very attractive but a little harder to bone.

14. Attach the straps. Leave extra length at the front for customization. While wearing the stays, mark where the straps hit the front edge & trim to fit.

15. Check yourself out in the mirror. Marvel at the lift, the curves & all the hard work that's gone into these stays so far.

16. Take a nap before proceeding to Step 3, finishing!


Labels: , , ,

Thursday, November 27, 2008

In One Autumnal Face

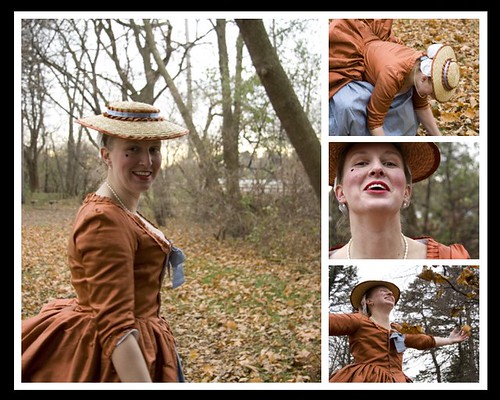
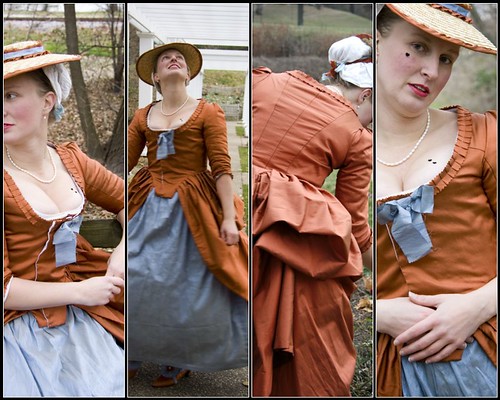
Just few little photo mosaics from a very successful photo shoot this past weekend. The gown shown is my 1770 era silk polonaise, affectionately dubbed the "Pretty Penny Gown". The matching hat & shoes were finished just in time for this years ONW/Colonial ball earlier this month. I'm wearing it over my standard underpinnings; red stomacher fronted stays, linen petticoat and cuffed linen shift. I did splurge and wear the delectable silk stockings from Spencer's Mercantile, which I received as a gift from my dear friend T. The outfit is accessorized with fresh water pearl drop earrings & matching necklace. Of course I couldn't dress up without including a few beauty marks. These are simple hearts, as I seem to have misplaced the tiny dancer I cut last year.

Photos are courtesy of my wonderful & talented friend A. I can't begin to thank her enough for braving the 35* weather with me (even though she had gloves!), chasing me around the gardens, making me laugh endlessly & most of all just being there to work on this project with me. She an extraordinary friend & I'm blessed to be the recipient of her talent.

All images were taken at Sinnissippi Gardens, a beautiful public garden and greenhouse in Rockford IL.

Labels: , , , ,

Monday, July 14, 2008

Stay The Course Part 1

Or how to construct mid 18th century fully boned stays with a stomacher front.

Step one: the fitting.

This is the most important step, so take your time, enlist friends as needed and it will pay off in the end.

materials:

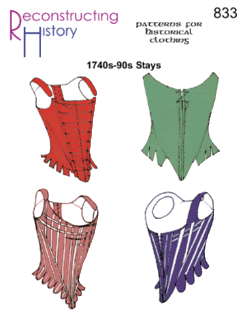
Pattern. I am using Reconstructing History #833 with the natural back & stomacher front options (shown in red on the pattern cover)
tracing of the chosen size of your pattern with any preliminary changes already marked
duct tape
large piece of corrugated cardboard. I get all my cardboard boxes from the local recycling center, so long as there aren't any raccoons living in them.
Sharpie marker
strong scissors
scrap linen
lacing cord or old shoelaces
hole punch
optional: small hammer

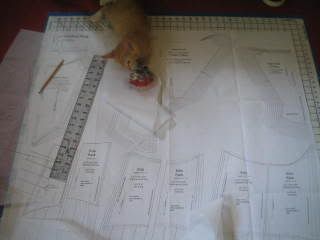
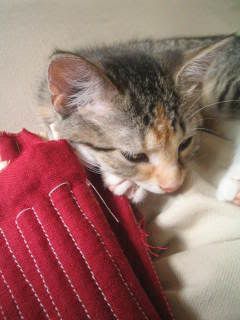
1. First make the tracing of your stays pattern. Because stays are an individualized item, there is no way that even the best commercial pattern is going to fit perfectly. I use pattern ease for all my pattern tracings, although any large, easily see through material would work. Note: Kitten help optional.

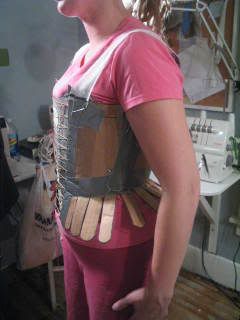
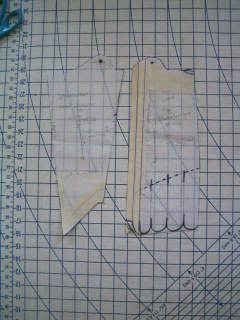
2. Lay out your cardboard in one large sheet. Place the cut out pattern tracing on the cardboard, orienting the pieces so that the channels in the cardboard run the same direction as any boning lines. On pieces where boning will run in multiple directions there are two options. Option A; cut multiple pieces of cardboard and tape them together to create the needed piece or option B; cut the piece with the channels in the direction that the majority of the boning channels will run. Trace all pieces with your Sharpie marker.

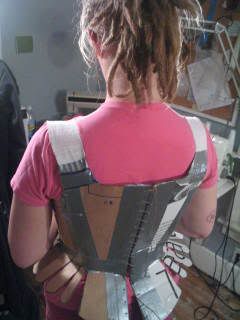
3. With sturdy scissors and a good movie on TV, cut out all the cardboard stay pieces, including the fingers (aka tabs). Use duct tape liberally to connect all the pieces into a 3-D cardboard copy of 18th century stays. Add extra tape at the waist near the top of the fingers and on either side of all laced openings.

4. Mark the lacing holes on all 4 pieces. The back should be arranged off-set to accommodate spiral lacing, while the front holes are set parallel for straight lacing. Use a hole punch to make all the holes, using a small hammer to force through the cardboard as needed.

5. Before trying on this cardboard creation, if you pattern has straps now is a good time to add them. I use scrap linen for my straps, since they will not be boned in the final set of stays, and therefore do not need the stiffness of cardboard. Cut & duct tape the shoulder straps in place but be prepared, their placement may need adjustment during the next step.

6. Lace the back panels together edge to edge. Now put the cardboard mock up on, lacing the front over the stomacher panel as if they were real stays & not some odd recycled art creation. While wearing this mock up note any discomfort. Move and bend as you will while wearing the final set of stays. Are the arm pits too high? Stomacher seem a little short? Back standing out & giving you that oh so 18th century ridge? How about the strap placement? What about the length of the fingers when you sit down? Use the Sharpie marker to mark any changes and areas that just don't feel comfortable. Remove the mock up and make any cuts and tape alterations. Alternately if you've got a trusted friend at hand, have them make the needed changes while you're still wearing the mock up. I also find have photos taken of this fitting stage to be extremely helpful. I can't always see my own back, but with photos I can & can make changes to the pieces by looking at the images.

7. Remove the altered mock up and lay as flat as possible. Over lay your pattern tracing pieces with the corresponding cardboard piece. Use tape, additional pattern easy & your scissors to transfer all changes to the pattern, adding or cutting away from the pattern tracing to customize the pieces.

8. Congratulate yourself with a big glass of Mikes Hard Lemonade, you've just customized your very own pattern for stays!

Next up: Cutting the fabric!

Labels: , ,

Tuesday, May 20, 2008

Under the weather or just feeling Flemish?

In honor of my 3rd year in attendance at the Janesville Renaissance Fair, I made myself a new outfit. Big surprise right.

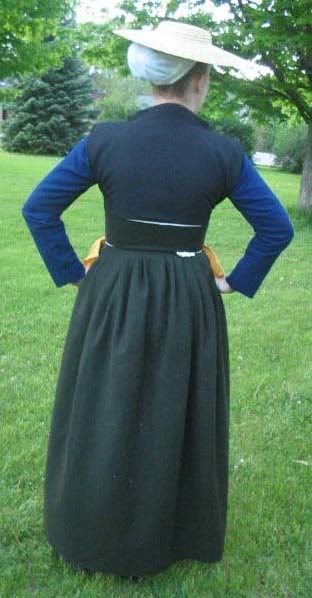
This is 16th century Flemish based entirely on Reconstructing History's pattern 209 (Netherlandish Common woman), which I bought because I like the little jacket, then didn't get to making said jacket! Oh well. I also spent a lot of time looking at Aertsen & Bruegel paintings to make sure I got the details right, especially since I went into this not knowing a darned thing about 16th century Flemish clothing and only had a week to work.


I'm wearing (from inside out), a linen/cotton blend smock, my 18th century stockings, one of my 18th century linen petticoats (the red one), a brown linen stomacher; lined & interlined with linen, a dark green wool kirtle, blue wool sleeves, white linen partlet, black wool partlet, yellow linen square ticked into a lace at my waist as an apron, white linen coif & my 18th century flat crowned straw hat. I wore my wooden shoes for the event and boy did people notice. I also learned that the wooden shoes while great on dirt & in the mud are terrible walking around in the Walmart!


The kirtle laces up the center front with a thin cotton lacing cord. On either side of the opening I slipped in 2 pieces of half round reed for support (of the bust more than anything!) I just poked the lacing through the material since I didn't think that rings on either side would take the strain that I was putting it under to hold my shape with no other support. The linen stomacher pinned in the center front & that helped a lot too. But look at that profile! I'm still amazed that with no bra my bust still managed to be high & round. Who says dressing historical isn't sex.

I got the kirtle wool from Hancock fabrics & it is the most beautiful forest green soft material ever! The black wool for the partlet was actually found in my local JoAnn's clearance section under spring suitings, as was the linen/cotton blend used for the smock.

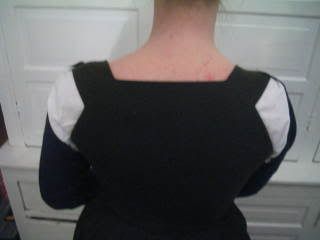
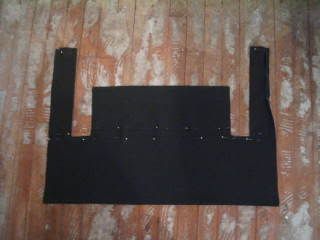
The back without partlets on. I could have set the straps a bit wider on the shoulders but I tend to have trouble with things falling off the edges when I do & I didn't want to risk any slipping. The most interesting thing is that the entire bodice is constructed from 1 rectangle of fabric! This is what it looks like without the straps attached to the back yet and an in progress picture. As it turned out the entire kirtle is hand sewn. The bodice construction meant that hand sewing was easiest so I figured, why not, and attached the skirt by hand as well. I was a little worried that it wouldn't hold up but then remembered that L's blue gown is hand sewn & held up fine so why was I to worry. I certainly don't "wear" my clothing as hard as a 7 year old does.


The fair was fun as usual, although too short! I got to see friends that I only see once a year, drank more root beer than a normal person should, saw 3 watermelons get shot to bits & enjoyed authentic 16th century gingerbread. Luckily I should get to wear this outfit again when we go to the bigger statewide renaissance fair in July. Hopefully by then I will have gotten around to making the jacket!

Thanks for looking! Now back to my regularly scheduled 18th century work.

Labels: ,

Thursday, February 14, 2008

Tied in Knots


I learned an interesting, unintentional lesson at Reenactorfest this past weekend.

The way your stays are laced significantly effects the way your stays fit & feel.

Saturday S laced me up. Since she rarely laces me into my stays, I walked her through the basics of spiral lacing. Over from one side, under the other. Despite not having worn my stays for nearly 2 months they were still comfortable. Bending, moving, dancing, nothing felt wrong or off about them.

Sunday S laced me in again, however this time I didn't walk her though the lacing pattern. For the life of me I couldn't figure out why they felt different. My arm pits felt bruised. I checked and it wasn't the reeds under my arms poking. I thought perhaps it was from the stays being stored flat over the winter, and the adjustment of wearing them for long periods of time after months off. As it turned out, I was subconsciously pushing my stays down with my arms, resulting in the bruised feeling under my arms. But why were they bothering me Sunday when they were fine on Saturday?

I found out when I got changed; S had laced me wrong. Rather than under one side, over the other she had laced me over one side, over the other, as if she was lacing one side of a shoe lace.

I never knew how much difference stay lacing could cause. From now on, I'll be keeping a closer eye on how my lacer does their job.

Of course it's even more encouragement to make a pair of front lacing stays for myself.

Labels: , ,