Slightly Obsessed

A long standing living history blog covering all eras with a special focus on clothing, food & social culture as well as first-person reenacting.

Name:
Location: Barrington, 2c79a7d7-8d84-e411-95ca-d4ae52b58f15, United States

Tuesday, January 30, 2007

Bottle Up Your Enthusiasm

Just a few touches to my "things".

From the wonderful Mary at Westmoore Pottery

Photobucket - Video and Image Hosting Photobucket - Video and Image Hosting

I already have to replace the cork, since my reshaped wine cork broke. These are the most lovely pieces I have ever seen. Hand blown glass "shaft & globe" bottle made in vA by John Pierce and Dave Byerly. The green mug is even prettier in better light. Plus it holds an entire pint! Nothing like a big drink to make a pirate happy.

Labels: ,

Monday, January 29, 2007

The "New Projects" List

The next "mark" on the calender is Port Washington's Pirate Fest in June. Seeing as that's a mere 4 months away, I have already begun planning & purchasing for the event. The list of projects to complete before Port Washington includes:

-a basic kit for L. She has actually asked for this so being the mom that I am, I'm jumping on the chance! Linen petticoats, unboned linen stays, linen shift & wool mantua. For this I'll be scaling down a combination of RH's mantua pattern & Waugh's Mantua pattern. I'm mentally working on a way to have her wear the mantua without pins or modern hooks etc. It may end up having eyelets under the front facing & being front laced. The stays will be from measurements run through the Custom Corset Pattern Generator Which is the same pattern generator I used on my Hemp Corded Bodice. I'll add tabs & sew the boning channels but leave everything empty except a rib on either side of the lacing holes, which might even be hemp cord to keep it flexible & soft for her. L is a modern child after all. She's asked for pink stays & is eying the pink silk ribbon in my stays. Mantua will be dark blue wool felt, outer petticoat will be the left over yellow that matches mine. The remainder of course will be plain white linen, much of it left over from my basic kit.

-tan & blue Hunting Frock. I snagged the 10 yards of tan wool gab for this when it went on $8/yard sale last week. I love the way the chocolate brown for the mantua fulled, so I'll do the same for this project. Lined with a yet unchosen blue linen. I'm leaning towards a rather deep indigo color. I'm going to learn to make Dorset thread buttons (in blue & green)for all the buttons on this coat. I'm tempted to make the waistcoat out of the same odd orange duponi silk as the half finished silk mantua. The color contrast with blue is so striking & I'm just a sucker for orange. It's that or brocade of some kind that I have yet to find. I have found a beautiful wool hat to complete the outfit though. Imagine that in tan trimmed out with blue & feathers with a broach in place of the button. Naturally the hat costs more than the entire outfit & I might end up getting a blank cartwheel hat & shaping it myself.

-The Fancy Mantua. ie the previously mentioned orange silk mantua with dark green petticoat. I want this to loop back on a belt with a chain. Still haven't found out what material to make the belt out of yet though. I'm thinking that it needs the little ruffle on the fold back part in a contrasting stripe (Gold & cream?). I'll need to wear a fontage with this outfit & that's pushing the whole project to the way back burner for now. Although the machine work on the mantua is finished (minus the facings). It's sitting in the bin waiting for inspiration & more research. However, the silk was 40% off over the weekend & I couldn't pass it up. It's got a train even, *so* fancy for me.

There are other projects, a "theatrical pirate costume" for a friends DH & I'd really like to make a few basic pieces for M since I know he'll love to wear them. But for now, L's kit takes top priority.

Labels:

Hemming & Hawing

The mantua is finished.

Here's mid pleating. Some are pinned, some are basted. I ended up having to tie the silk thread oddly to keep it from pulling out under the weight of the wool. I couldn't tie knots big enough not to pull free (pun unintentional).
Photobucket - Video and Image Hosting

I realized yesterday why the front didn't seem right. Someplace along the line I lost the front pleat. Well, there's a classic Chole project for you. I ended up cutting back the front to create the V shape I wanted. Waugh's has a slanted front so it's not totally out of the question for it to be shaped that way.

I also faced the entire front rather than just the top portion. I like the way it finishes better, especailly since I'm not sure how the fulled wool gab. would unravel & I want the hems & seams as finished as possible.

All in all, not perfect, but not bad. All that's left is the bottom hem & the tie backs. Originally I was going to leave it hanging, but it just doesn't look right that way. So I've got to sit down and whip off a couple of cloth covered buttons & the tie backs. I thought about taking T's idea & making a few thread wrapped buttons but I don't have any wool floss & the linen & silk I can find aren't the right color. So it's cloth wrapped, which is faster anyway.

Wed I'll do a "test run" & wear the whole kit all day to see where there might be any problems. I'm not anticipating anything with the base, stays/shift/petticoats since I've worn them twice now without problems. I already learned that the brass pins I have didn't cut it for holding the heavy wool pins together, so I'll be using old tailors pins instead. The brass will be perfect for the silk mantua though.

Which brings me to the next bit, I've already started on another mantua. This one is Duponi silk in a rusty orange color. It's cut & partially constructed already. I started having a panic attack on Friday about not having done enough the last two months & not having something "pretty" to wear to the ball. Well the silk mantua won't be finished by RF2. It could be, but since I don't have a fancy petticoat that I like to go with it and I have no ideas/solutions for hiding my hair except under a non-fancy cap, I set the whole project aside until later.

So anyway, I'm off to put those finishing touches on the brown wool mantua & throw together some linen pockets. Even though noone will be able to see them, I just don't feel right having any cotton/poly material on me with all the other work I've put into the kit.

and that would be the point in which I surpass "Slightly Obsessed".

Labels: ,

Sunday, January 21, 2007

Come Together

Progress is being made on the mantua, despite quite a few mistakes & completely not understanding the turning gore. Tomorrow S will help me get the back pleats just right. I have been trying it on Sticky but I keep going around in circles. I really need another set of eyes saying "yes, that's right. No that's not".

That didn't stop me from putting on everything I have finished on today & wearing it around the house. I need to put some hours into wearing the stays to get the tabs shaped to me better. I wanted to see how the neckline of the shift worked out & where to cut off the sleeves. I have since decided that I'm just going to fold the sleeves back & tack into place. Maybe. I don't really want to cut them off & hem but that's way at the bottom of the "to do" list anyway. I also need to either hem up a linen neckerchief or dig out one of the silks. The exposed neck area is nice, but way to "ren faire wench". The cap also needs to be redone. This is the too small version.

Photobucket - Video and Image Hosting

Naturally, pardon the terrible self portrait. No one is willing to help take photos around here. It's enough to make a girl think she's not photogenic.

So now, since I'm rambling. I've been thinking about how lazy I've been these last 2 months. I could have gotten so much more done & I haven't. I wish I had another outfit, something fancy to wear to the ball. If I had worked harder and spent more time working on this stuff then I could have gotten something nice made as well. There is that part of me that says, hey, just whip out another skirt & another mantua. Once you get one finished how hard will be making another? Yes, it's true, I'm already feeling like a failure and like all this work is just junk. I hate this point in a project.

Photobucket - Video and Image Hosting

Labels: , ,

Monday, January 15, 2007

Stay Tuned

Finished! It only took about 5 hours (& the end of Captain Blood) to sew all the eyelets. Not much else to say about this right now really.

Photobucket - Video and Image Hosting

They aren't laced on Sticky. They need to stretch a bit & the tabs haven't started bending outward yet. Poor Sticky is just too much of a pushover. Her hips were bending in when I tried to lace her up. So instead, I'm sitting around wearing them in.

Photobucket - Video and Image Hosting

L's touch was suggesting I use the pink silk ribbon out of my collection on the shoulders. I've also added a nice fat green ribbon to my shoes. I love that ribbon.

Labels: ,

Sunday, January 14, 2007

Shifty Business

Almost completed my shift tonight.

Photobucket - Video and Image Hosting

Yes, it would be perfect for the headless horseman at this point. I left the head hole out until I've finished the stays & can cut the neckline with the stays on. This way I'll be sure that the shift isn't too big in the neck or too small either. Like every other shift I've made, the sleeves are too long. Oh well, a little chop-chop and they will be perfect. That too will wait until it's being worn. Last I'll do the hem, but that's another quick machine project. I can blind hem on a machine in my sleep!

3oz hanky linen from Fabric-store.com (where else?), machine sewn so far (will finish neck & sleeves by hand) with silk thread. The linen I'm saving for my cap & other 5oz projects since it's the heavier weight thread. Linen & silk is a fabric-gasm if I ever had one. Especially with this light weight linen. I was originally going to use 5oz but changed my mind. I figure, if you're using essentially the same material for the entire outfit, might as well change the weights & weaves up a bit. I've very happy I went with the lighter. It feels exactly like I wanted.

Photobucket - Video and Image Hosting

Look ma, French seams. A word to the wise, French seams and gussets do not play nicely together. Also, I remembered why you're supposed to trim the first seam before flipping & "frenching". When you don't, you might not have problems catching the first seam inside, but you could very well end up with hairy seams. Ooopsy. Thankfully most of the loose thread can out with a quick pull. Now maybe it was me but I found the hairy seam in the underarm gusset to be very funny at 1:30 this morning!

Labels: , ,

Tuesday, January 09, 2007

Reed All About It

It occurred to me that I haven't gotten to telling about my adventures with Reed Boning yet. Since I've already moved forward with the Linen-Reed Stays project, this is a quick summary. I'll up load the photos to go along with the process when the stays are complete.

The steps involved in Reed Boning (at least the way I did it) are as follows:

-Order more #9, 1/4" round reed than you think you'll need. Twice as much is a safe bet. If you don't order too much you won't have enough. Murphy's Law and all that.

-Soak reed in hot water in your bathtub. Stop to run to the basement when the hot water heater gas valve shuts off as it always does in the middle of this kind of project. Have kid help push the reeds around in the water to keep her from bothering you.

-Remove each reed from the water & stretch & flex the pieces against the curve to help them straighten out. Be rather impressed at how flexible they actually are. Get over confident and break one.

-Lay pieces out to dry a bit. Overnight and into the next day seems like a good amount of time.

-Cut lengths of reed longer than the channels you'll be inserting into. Trust me on that, you need to have something to hold onto as you shove the pieces in to place.

-Lightly wax each piece. Not too much or they will stick in the channels. Not too little or the splinters in the reed will stick in the channels.

-Be very thankful that you purchased that block of pure, wonderful smelling beeswax! Go back to the seller on E-bay and buy a dozen more.

-Put a band-aid on the enormous blister on your thumb so you can continue shoving stubborn reeds into the channels that are just barely wide enough. Stop and check your measurements again to confirm that the channels are just barely wide enough.

-Curse & swear, scream & cry at how impossibly hard it is to put so much reed in between several layers of linen at 3 in the morning because that's the only time you get to yourself to work on this kind of thing.

-Stick your throbbing, blistered hands into a bowl of ice so you can get this step finished already! To hell with the pain, just get it done.

-When a piece is to stubborn to go in all the way, pull it out & try going from the other direction. Continue this back & forth, back & forth until you've stretched the just barely wide enough channel to fit the reed.

Photobucket - Video and Image Hosting -
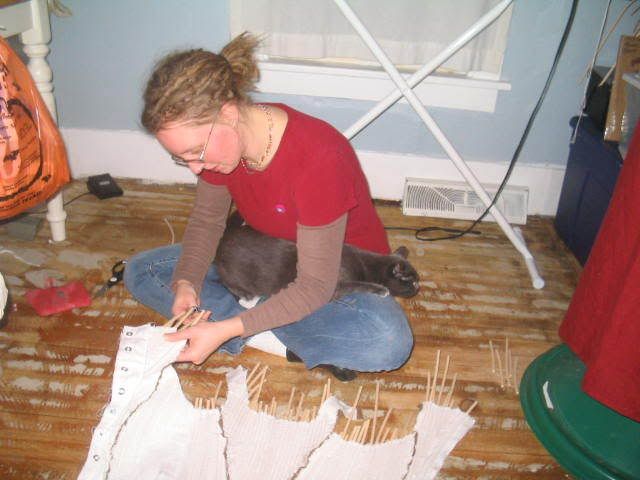
Insert cat onto lap.

-Try using the pencil sharpener to taper some of the reed ends, especailly the ones that have dead ends into other channels thanks to the boning arrangement.

-Cheer when you get every last channel filled, minus the two that were sewn entirely too narrow and the two channels where the eyelet lacing holes will go.

-Mark the edge of the fabric on each piece of reed.

-Pull the reeds out slightly and trim off below that marked line. Yes I said below. Be generous with that cut because they one time you aren't is the time that it will matter. You want to end up with at least a 1/2 thumbs width from the edge to the top of the reed so when you put on the binding you're not trying to sew through the reeds. Plus if your edge is wide enough you can machine sew the binding. Not that I've ever been so lucky!

-Send reed shrapnel flying all over the sewing room. Laugh at the kitten who thinks they are toys. Gather all the extra pieces & have enough to construct a model log cabin.

-Push the reed back into place & repeat the mark & trim process on the bottom side. Alternately you can push the reed down to the right space on the top & only pull out & trim from the bottom. Don't forget to be generous with those cuts.

-Check to make sure all the reeds are in their proper place and that you didn't miss any. Trim the few that you didn't cut short enough in the first place.

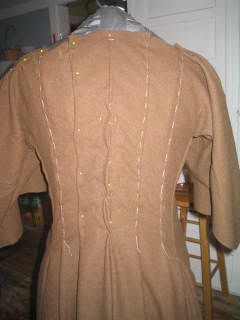
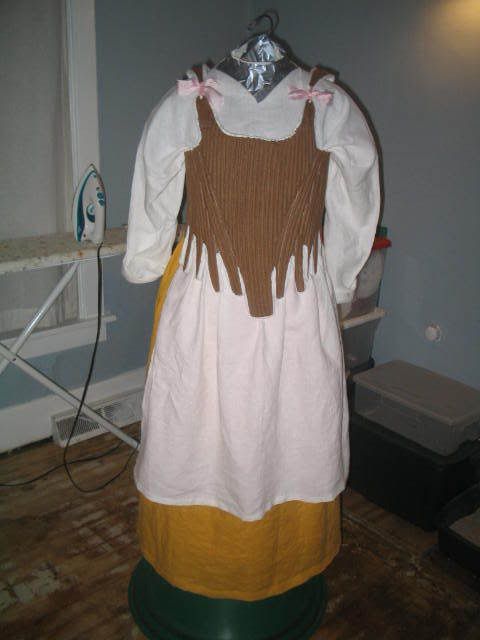
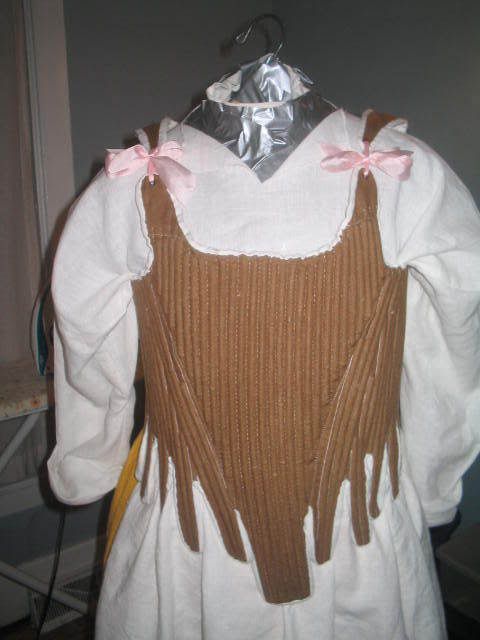
-Marvel at your fully boned set of stays!! Take pictures & brag to everyone within ear shot that they are boned!

-Take three anti-anxiety pills & drink a bottle of wine, it's time to try these suckers on!

-Baste in your lacing strips. Dig out the 2 yard long piece of linen cord you've been hording for just this purpose.

-Realize that no one in the house will help you get into these back lacing stays. Damn! Consider waiting until a helper can be found. Give up on that idea out of sheer impatience.

-Take stays into bathroom & close the door, leaving cats & kid on the other side! Ignore all "mommys" and "meows".

-Put on an undershirt for later photographic modesty since you haven't made a proper shift yet & while you're at it, put on a petticoat so no one sees your underwear in the pictures either.

-Put the stays on yourself in an amazing feat of contortionism that even you didn't think was possible. (Actually it's not that hard. You put them on backwards, spin them around, smoosh in the boobs, and tighten the lacing using one hand to hold the cord tight while the other gathers in the slack.)

-Panic at the stiffness of the reed. Stop panicking when the Empress confirms that yes, the reed will bend and form to you're shape and you won't be stuck with those boned tabs digging into every bit of fat around your hips forever.

-Panic again at the overly large gap in the back even with the extra 2" worth in the lacing strips. Stop panicking when T digs up tons of great information for you about linen stretching & reed bending & a laundry list of tips if that doesn't solve the gap problem.

-Add two more dues to your "tab". Be very thankful that you've got friends who "get" the insane historic costumer "thing", even if it means you'll be paying in Chocolate & Silk Floss for the rest of your life.

-Decide after wearing the stays around the house for 2 hours, that they are really quite comfortable & you're not really anxious to take them off as you were the first 5 minutes after putting them on.

-Move on to the NEXT STEP!

Labels: , ,