Slightly Obsessed

A long standing living history blog covering all eras with a special focus on clothing, food & social culture as well as first-person reenacting.

Name:
Location: Barrington, 2c79a7d7-8d84-e411-95ca-d4ae52b58f15, United States

Friday, December 29, 2006

The Line Up & the Stitch

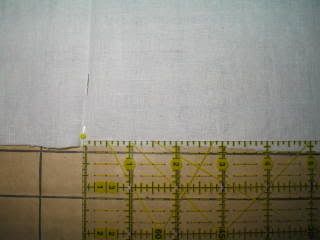
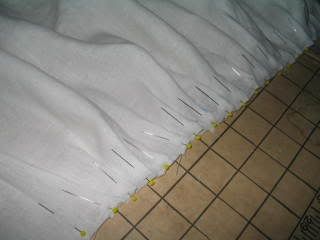
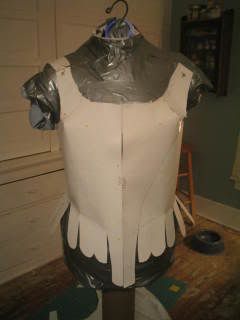
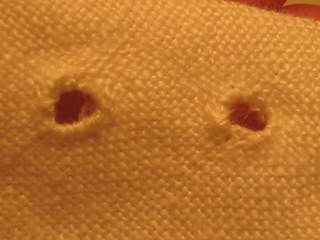
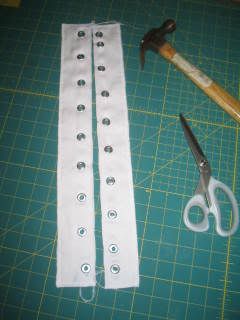
Finished! 7 hours, 24 minutes later and the entire collection of boning channels on the front stomacher panel is (hand) sewn! I'd count the individual channels, but that would be bragging.

Photobucket - Video and Image Hosting

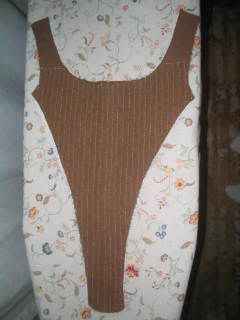
and the close-up because I'm just so damned proud of myself!
Photobucket - Video and Image Hosting

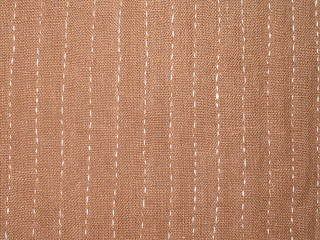
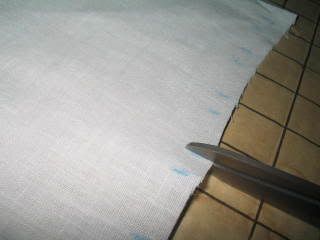
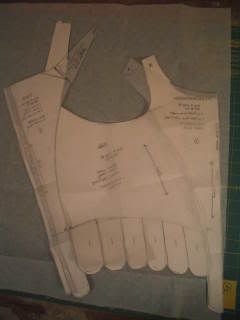
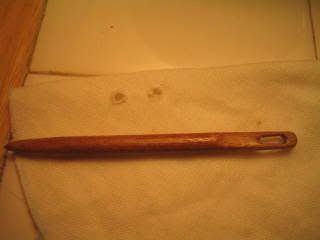
I started in the center and worked from there. Then, because my sewing improved greatly over the course of the channels, I removed & re stitched the center line. I have never been one to do much hand sewing. In fact this is the most consistent hand sewing that I've ever done. By the end of this project, I'll be rather accomplished I think.

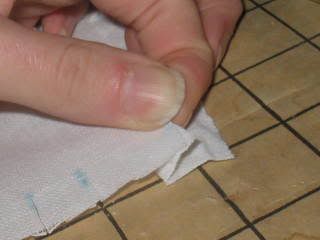
Now it's obviously "hand sewn". As someone said once, more sailor made than tailor made. I'm blaming the fact that I even considered this on Toria. She was the one who questioned whether I'd truly be happy with visible machine stitching, when I was taking the time to do so much of the nearly invisible stitching by hand. Then a discussion with my mother confirmed that, no, I would not be happy and the work that I'm putting into this and the length of time that I hope to be using these stays, really was worth the extra time.

Never the less the remainder of the channels will be machine sewn. They aren't readily visible and I'm not truly insane just yet. After all I have plenty of hand sewing to do on my shift & mantua. There is no need to wear out my enjoyment of hand sewing on just one piece.

As a total, unrelated to sewing aside, I owe Matt one last thank you for the audio book download of Captain Blood that made this mindless task actually enjoyable. I have a few hours of listening left & even though my hands are stiffening even as I type, I'm trying to think of what the sew next just so I can finish the story! Thanks a ton sweets!

Labels: ,

Thursday, December 28, 2006

Petticoat Junction

All three linen petticoats are finished!

#1, all white, 5oz linen. Shortest length at about 32". Linen tape waistbands. This one was made with 60" wide fabric, which turned out entirely too wide for me and nearly wraps around me twice from both the front and back. This is also the most machine sewn of the bunch, since it will be worn underneath all the others. Makes a great under layer piece.

#2 Mustard colored 5oz linen. Mid length. Linen tape waistbands. Not long enough to count as anything but a lower-class "criers" length. As the Empress always says "we're not Victorians after all". This is from 45" wide fabric and fits much better around. I can even access my pockets while wearing it. Machined seams and pleating stitches but waistband and hem are hand done.

#3 Madder Red colored 5oz linen. Essentially the same as the Mustard petticoat except this was meant to be longer. An oops with my cutting made it the same length as the Mustard but with a narrower hand done hem. I also did the waistband treatment a little differently. Rather than stitch and flip to the inside leaving a narrow band on the outside (and my visible machine stitching holding the pleats in place) I stitched and flipped to the outside without leaving any tape inside. This gave me enough over lap to hide the machine stitching and have a nice neat white waistband

Now that I'm done with these the work moves forward to the hand sewing (at least the visible front) of the boning channels on the stays.

Labels: , ,

Sunday, December 17, 2006

Taking a Stab at Knife Pleating

Today I took a stab at knife pleating my petticoats. Since some of the other ladies might find the technique helpful, here's a little tutorial.

Knife pleating is a basic technique most commonly seen in catholic school girl uniforms, kilts & those tiny things cheerleaders call skirts. The unidirectional folds produce a flat front that does not spring out from the waistband the way gathers or cartridge pleating does. Despite the narrow pleated area and straight line you still get a nice fullness below the pleats.

During the GAoP knife pleating was the way to go for petticoats. I'm not a huge fan of pleating in general. Nor gathering for that matter. I have a terrible time with making it even enough for my taste. However, in the effort to be period correct, it's knife pleating all the way.

Materials:
fabric to pleat
scissors
fabric marker or tailors chalk
pins if you're picky
ruler with one inch and 1/2 inch markings

Start with the piece you wish to pleat. This is a standard 3-1 knife pleat, meaning that 3 inches of fabric become 1 inch of pleat. Now if you're doing you math that means a 30" waistband will need 3 times that (or 90") if pleated properly. If you're like me you'll need less. My finished pleated piece always ends up to big, no matter how much math I do.

Lay out your fabric and find the center. Mark in your preferred method, I like to iron & stick a pin just so I don't forget. Place cats strategically around fabric so that it doesn't move!

Cats as fabric weights

From the center measure 1" to the right, make a mark. From there measure 1/2" over & mark. Measure 1" from there, mark, move another 1/2", mark. See the pattern? You're making a series of 1" and 1/2" wide sections. Keep going until you reach the end of your half. Now go back to the center & repeat, until you reach the left hand side.

Mark your pleats

Congratulations, you've just marked out all your pleats. From here you have two choices, you can fold without snipping or you can snip at each mark. I prefer to snip. It seems to make the folds easier to form and lay flatter. Some daring sewers even snip without marking in advance, gasp! The trick is that these don't have to be deep cuts, a less than 1/4" snip is enough.

Snip snip snip

Now comes the fun, folding! Start at one end, it doesn't matter which. I usually end up starting at the end that I ended up at after snipping. Otherwise I'm crawling back & forth constantly! Find your first 1/2" section from the end. That part goes in the middle of the pleat "sandwich" if you will. Pinch the 1/2" section together with the 1" section closer to the center. Fold this down onto the 1" section towards the end. Pin to hold in place.

This is mid-pleat. You can see the 1" section on the bottom and top with the 1/2" section as the middle layer in the sandwich.

Fold your pleat sandwich

Alternately you can do this while on the machine & skip the pinning. Simply fold a pleat or two at a time, holding in place while you sew them down. I personally prefer pinning because I'm a butter fingers and even with pins tend to drop pleats.

Keep folding 1/2" sections in between 1" sections until you reach the center. You'll notice that you end up with a wider section at the center. Don't panic, that's the way it should be. That little fold in the front makes it lay nice and flat across the stomach, yet lets it flare over the hips.

The center

Now go to the other end, and start pleating again. Continue to fold your pleats towards the end, i.e the opposite direction that you pleated the previous half. When you have successfully pleated your entire piece it should look something like this.

a pile of pleats

Now we get to secure the pleats with stitching. If you're of the very particular historical sort, you'd be pulling out the needle & thread and hand sewing all those nicely pinned pleats. I am not that particular, so we'll be machine sewing the pleats, thank you. I've found that for me it's best to start in the center & sew with the direction of the folds. This seems to keep the pleats from folding back on themselves under the presser foot. The only trick is to make sure that you are stitching below the snips you made earlier. This is where it's important that those were tiny cuts. If you tried to sew over them, you'd loose all your pleats & all that crawling around on the floor would have been for nothing!

Stitch those pleats

Now I like to sew a second line of stitching about 1/4" down from the first. This gives me the chance to refold any pleats that got away from me during the first run and I like how it produces a slightly flatter waistband area. On skirts such as school girl style or cheerleader style, the second line of stitching is much further down. This forms a flat fronted waist and hip area yet leaves a nicely flared and full skirt. That's what makes those skirts so darned cute!

Photobucket - Video and Image Hosting

Now you can finish your project as needed. For me I'll be sewing two knife pleated panels together and adding linen tape waistbands to create a basic linen petticoat that ties in the front and back. Then I get to do it all over again with two other lengths of linen. Yippee!

Hopefully this little tutorial has helped everyone add a new classic technique to their sewing skills book. Now get pleating!

Labels: , ,

Friday, December 15, 2006

Giving the Final Order

Made, what should be the final supplies order from Wooded Hamlet today. Big pile of basics like dutch linen tape, lacing cord, button hole twist & brass pins. I ended up not getting the silk thread from them since I can get the same stuff for the same price at Attic Quilts & the ladies there will order what ever colors I ask for. Plus that gives me an excuse to go for a visit over there.

Yesterday I took advantage of the Jas Townsend deal on tan-ish linen thread. $15 for 3 spools shipped. I figure you can never really have enough thread (or fabric or ribbon for that matter). This is an off tan color that should stand out a lot less than white-white would with the colors of my fabrics. As soon as that arrives I'll get to sewing the reed channels in the stays.

Yes, I cut all the fabric the other night. It's waiting in the bin just tormenting me! I had a brilliant thought to use the quilters guide to sew evenly spaced channels. Now just to dig around in the sewing room to find that darned thing. It's designed for sewing evenly spaced straight lines, so why spend the time drawing every single line when I can use a tool I already have, someplace! Plus I was at the JoAnn's tomorrow and completely forgot to pick up a new disappearing marker and I'm not going back for another week.

Labels:

If the Shoe Fits Part 3

My shoes are finished. **Happy Shoe Dance**

Mr. Foxe offered me advice on lacing them yesterday. He suggested poking 2 holes in each latch and lacing through them. This doesn't prevent using buckles later like folding the latches back & stitching them down. After seeing it in pictures, I had to try it.

Now poking holes in leather is not easy. If you are going to do this, don't get lazy and say "oh, this tool will work fine. I don't need to go digging in the basement for the leather tools" because if you do that, it will take longer to make the holes than finding the proper tools would have. After much convincing I ended up with 8 holes, actually 10 (oops) but that makes them look like they have been worn & adjusted. interestingly the extra holes are in my larger foot, I was too generous with the adjustment between the two.

I dug out a scrap of thin ribbon from the ribbon bin & laced them up. The trick is that there are 2 holes in each latch. The ribbon goes through both holes in the bottom, up through the top like a big "U". Then the ribbon is tied together. Very easy & very simple. It was harder to get a decent picture of my own feet, one that doesn't make them look like they bend outward funny.

Photobucket - Video and Image Hosting

Now, when the lot of random silk ribbons I ordered arrives I'll dig through and find a nice big fat ribbon & tie a good bow on these. Something nice & floppy like in the Cries. Little random details like that is the reason I got that box of ribbons. You can never have enough scrap ribbon around for projects.

The more I wear these shoes, the more comfortable they become. I haven't even added a padded insole like Rats suggested. Although I did need a pad in the heel to take up the extra space. That's the trouble with having woman's feet & fitting into men's shoes. I couldn't go to a smaller size and still have toe room but the heel area is much wider than mine are. The pad helps, as does wearing an extra sock underneath my smaller foot. Since I do that a lot in mundane shoes as well, it's not a surprise. I have also stopped slipping around as the heel & soles have gotten nice & scuffed. These might actually turn out to be some of my favorite shoes right now.

Labels:

Wednesday, December 13, 2006

Reed between the lines

The round reed boning from Cane & Reed arrived today. Oh dear! It's giving me a panic. To start with 1/4" is a lot thicker than it seems when you see it in person. It's more like 4 strands of the Hemp cord. And it's stiff. Very stiff and hard. But pleasantly light weight. I can't see the stays being heavy, more rigid though. There is no way I'll need or even want a busk with this. I'm understanding why the Empress had me do the fitting with cardboard. Even the heaviest canvas couldn't hold a candle to how stiff this reed will make the final stays.

Now I just need to get up the courage to cut the fabric & start putting these together.

Labels: , ,

Tuesday, December 05, 2006

If The Shoe Fits Part 2

My Fugawee shoes arrived today. I stuck the velcro on to pull the latches out of the way & laced them up with a piece of leather cord and taadaa, shoes.

Photobucket - Video and Image Hosting

Now these are NOT GAoP correct, but they are as close as we come for my current shoe budget of $100. The astute observer (ie the other nuts in the room) will note the lack of butt stitching, the way the latch is attached wrong, the left & right last & the reenforced heel. But to the, well lets call them "sane" general public, these look like standard buckle shoes (once I get some buckles that is). So until the Empress opens her "End All, Bee All GAoP Shoppe" and sells period correct shoes for budget minded pirates, these will be what I wear.

Photobucket - Video and Image HostingPhotobucket - Video and Image Hosting

Now I've been pouring over the Laroon "Cryes & Hawlkers of London" images reciently and one thing I noticed was that every one of them has ribbon tied lachet shoes. So I am considering NOT setting these up for buckles but stitching the lachets back & lacing them. Since I would want to get the single prong (& period appropriate) buckles that GOF has promised, perhaps it is a better idea to save those for the period appropirate shoes as well.

So many choices to make!

Labels: , ,

How Very Fitting

I spent my evening sewing time working out the fitting problems with my stays pattern on Sticky. For a while I seriously doubted my skills. I had a few waves of panic that there was no way I would be able to fit them properly, that I would spend all this time & money & they would be junk. I wished that I had the skilled hands of the Empress showing me what to do, or that at least my mom was looking over my shoulder helping. But alas, except for the kid & the cats, I had no help.

I did eventually get things straightened out. To start with, I had to smoosh Sticky's boobs in to get the cardboard pattern to actually "mould" in the way the stays will. I also learned that you can stick the pins right into the tape if you want, but if this is something you plan to do frequently it might not be a good idea, as it will shorten the life of your dummy. Although with the cardboard there wasn't another way.

I have narrow shoulders and a large bust, which makes fitting in the shoulders a little tricky. I had PM'd Kass earlier to see where the straps should be sitting and got the OK to move them to a more "on the shoulder" position. But this meant completely reshaping both the front & the back curves to match my shape. This is where I paniced a little. I ended up getting one side perfect and will use that for both. I'm not lopsided enough that the difference between left & right will be noticable if there is much of a difference at all.

Here you can see the cardboard pattern on Sticky.

Photobucket - Video and Image Hosting

Here is the fitted half of the cardboard under the original tracing of the pattern. You can see how much I changed the angle of the straps. I ended up not needing to re-trace the back pattern. Instead I laid out the shoulder strap piece at the proper angle and marked the adjustment on both pieces. I did re-trace the front piece though.

Photobucket - Video and Image Hosting

I also have a short torso and, as I had to do with the hemp corded bodice, I dropped the front neck line about an inch. At first I had only about a 3" deptb from my collar bone, ie they were practically choking me. I dropped it to almost 5" and I think that will actually work alright. It will give me some chest area that I would loose otherwise but not be over the top. But again I paniced not wanting to cut too low or leave it without lowering. Probibly by this point I was just in a state of panic and self doubt as comes with all big projects like this.

The stays are the single most imporatant part of this project. They will take the most time & they make the biggest impact on the final product for things like the mantua. They are also the one area that I have worked in before & been unhappy with the result. I'm sure that the problems with the Hemp Corded Bodice are effecting my work on these (which I should refer to as the Linen Reed Stays). But with the HCB I did flat fitting & went off a self made pattern based on measurements. I really think the fitting with Sticky, using lacing tapes during construction and using a prooven pattern like Reconstructing Histories, will make all the difference.

Labels: , ,

The Eagle has Landed

Today was a banner mail day.

I got the cube of natural bees wax that I ordered. I couldn't just go to the fabric store & get one of the Dritz thread waxers, so sir! I had to have something natural and without the packaging. Something just a little fancy & special to make the work of hand sewing that much more enjoyable. It's all about having the right tools to make the jobs easy and this piece of wax will do that. Plus it just smells delish!

Photobucket - Video and Image Hosting

I also got the 3 bars of old fashioned Lye Soap that I ordered. I just couldn't reconcile doing all this work on these clothes and then throwing them in the washing machine with Tide! I had to hunt to find someone that makes their lye soap the real old fashioned way and I'm glad I did. This stuff is beautiful, I think it may become a household staple. It smells amazingly like *soap* and nothing else. I am still prewashing all my fabrics with All like usual but once the pieces are finished they will get washed in Lye & nothing else, most likely by hand & hung on the fence to dry. Yes, I am just *that* concerned about these pieces being so authentic.

Photobucket - Video and Image Hosting

Finally, my Fabric-store order also arrived. Nothing better than piles of lovely linen fabric. At first I couldn't remember why I got an extra yard of the 6 oz white, until I remembered why I got an extra yard of the red, for the stomacher. Although I'm now questioning wether I should make the stays in the red. Heck, maybe I should just make them in the red & if I don't like it, make another pair in the brown! It never hurt a girl to have 2 pairs of stays just in case.

Photobucket - Video and Image Hosting

Labels:

Sunday, December 03, 2006

Holey Cow!

Today was a day full of poking holes in things.

First up, I didn't manage to "win" any of the bone stilletoes/bodkins off E-bay. However, a lady at a forum I'm on happened to have a wooden bodkin she got in a set of crochet needles. She didn't need it, so sent it to me for free! I may still need to get a sharper pointed stilletto, but this works well. Took 2 layers of linen from the scrap bin & a pre-threaded silk needle and whipped off 2 eyelets. They will be so much better with silk button hole twist or a bit of wool embrodiery thread in a contrasting color.

Photobucket - Video and Image Hosting

Photobucket - Video and Image Hosting

Next up, a set of lacing strips. Nothing more than 4 layers of muslin with cheap grommits. The point is that before punching the holes in my stays, these will be baised in so the stays can be tried on. I seriously *hate* grommits. I hate cutting into the fabric. This is one of the best reasons to do eyelets, you don't actually cut the fabric or break the weave at all. The bodkin pushes the threads apart and the stitching holds them open. Theoretically you can remove an eyelet and not have a hole. Can't say the same with grommits. You'll notice that even for something as basic as lacing strips, I still set the grommits up for spiral lacing. If you don't know the joys of Spiral Lacing, you don't know what you're missing.

Photobucket - Video and Image Hosting

Although the pounding with a hammer is rather cathartic!

Labels: ,

Friday, December 01, 2006

Paper Dolls

Patterns from Reconstructing History arrived yesterday. I sat down last night & read all the information. Kass' number one tip is to make a mock-up out of Bristol board. Knowing that I always need adjustments for my narrow shoulders and larger bust, I did as she suggested. Unfortunatly I was to wrapped (literally) up in what I was doing that I didn't get any pictures. Take my word for it, 'dressing' in posterboard isn't easy.

I also took an idea offered by L. I was having trouble with my bust. The stays hold the bust up, but the board wasn't enough to support "the girls". L suggested, why don't you put on a bra. Leave it to a 6year old to understand things. I was able to position everything the way it should be once the stays are laced which helped get the fit across the back & shoulders correct.

Adjustments turned out to be very minor. Dropped the armpit, sorry arm scye (sp?), about 3/8". Dropped the front neck about the same distance. Only a minor curve change in the hips to raise the tabs less than 1/4" on one side (the kids carrying side). The final adjustments will come from the shoulder straps. That's the biggest change I had to make in the hemp corded bodice I made in June as well. I end up having to add a triangle to adjust the angle just enought. It's not a lot but makes a big difference.

Now all I have to do is order up my round reeds, linen tape & thread. I am also still waiting for the fabric to arrive, but once it's here I'll start cutting. The last detail to decide on is wether the flax colored linen tape should be dyed or left natural. Natural is more neutral, color is just more fun! I'll probibly leave it. I also need to ask Kass her opinions on using the busc or not. I haven't decided. With my bust it might be better to use the busc, but that's a bit more work. Decisions decisions.

Labels: , ,

To Cap It All Off Part 1

I've been working on getting the perfect linen cap to cover my hair. I'm not there yet, still so much tweeking to do before it's the way I want it. But for now, I have a cap (actually 2, one fits L better). So come RF, if I haven't gotten around to perfecting the pattern, I will at least have something to cover my hair.

Made from 100% linen and silk thread. All hand sewn. This combo is a dream to work with. Almost enough to make me consider doing *more* hand sewing.

the too small one.
Photobucket - Video and Image Hosting

and a bad picture of it on me. I think it's really too short side to side & across the back. However looking at the Chocolatier (I think that's the paintings name) it could work for later than period.
Photobucket - Video and Image Hosting

The front of the larger cap
Photobucket - Video and Image Hosting

Side
Photobucket - Video and Image Hosting

back
Photobucket - Video and Image Hosting

I think it's too gathered. And I don't like the fold back. Next version will just have a narrower band and a smaller pouch. I'm also going to get some linen cord for the drawstring in the back. I'm thinking that rather than gathering into the band it should be just a smidge bigger & pleated once or twice.

The other problem I'm having has nothing to do with sewing & everything to do with my hair shrinking. I'm having a hard time pulling it back. When it's in a bun it sticks out, which makes the back of the cap stick out funny. But when it's down, dreads tend to escape. This will have ot be fiddled with more come Jan since there is no telling how my hair will change between now & then.

Sorry, can't get the camera to focus close enough to see the stitching. Trust me when I say that even doubled the slik thread is virtually invisable.

But for now, I have patterns to play with & stays to make!

Labels: , ,