Slightly Obsessed

A long standing living history blog covering all eras with a special focus on clothing, food & social culture as well as first-person reenacting.

Name:
Location: Barrington, 2c79a7d7-8d84-e411-95ca-d4ae52b58f15, United States

Thursday, April 21, 2011

Putting Your Best Foot Forward

A lot of people have been discussing 18th century shoes recently and I couldn't help but jump into the fun. Following is a little humorous little review of the shoes listed in the Virginia Runaway Advertisements, one of my favorite on-line sources for clothing among the common class in the 18th century. If you have ever wondered how to describe the clothing we wear at reenactments, look no further.

Of 547 listings for “Shoes” in the Virginia Runaway archive

Quantity of Shoes:
A single pair shows up most often, but there are several individuals who needed a spare so they took two pair of shoes (13 people listed between 1768 & 1776 took two pairs), or three pair of shoes (1737 & 1773) and one greedy fellow even took with him 4 pair of shoes (1771)! There was also a man who apparently couldn't decide what kind of footwear he wanted, so he took “both a pair of pumps and a pair of shoes” (1772). Not to mention the man who stole at least 6 pairs of children's shoes.

Gender:
Gender is rarely mentioned when referring to shoes, presumably because men would be wearing and taking men's shoes and vice versa. The few times gender is mentioned however are a “pair of men's shoes” (1738), “country made women's shoes” (1746), “three Pair of Boys Shoes, three Girls ditto” (1755) which was also mentioned above and “two Pair of Women's Shoes” (1771).

Materials:
The majority of shoes mentioned do not list material. However, of the materials that are mentioned, leather is the most common. There are shoes made of “leather” (1738 & 1752), “Leather pumps or shoes” (1739), “the other [pair] red Leather” (1755), shoes of “stiff leather“ (1771), “English made Leather” (1773), “new Leather Shoes, with wooden Heels” (1773), “a pair of leather shoes, with wooden heals” (1775) which were apparently not so new anymore, and a pair of “high-heeled leather shoes” (1776). There were also “Leather-heel'd sharp-toed Shoes” (1752) and just plain “Leather heeled“ (1773) shoes.

Only a few examples of non-leather shoes are listed in the runaway advertisements, which makes sense considering the generally lower class status of the runaways. What good are pretty silk shoes going to do when you are either working, or escaping from your master? There are listings for “one Damask, [and] one Callimanco” (1755), “blue calimanco shoes” (1767), “black calimanco shoes” (1770) and "old black calimanco shoes with plain silver buckles” (1772).

Colors:
Not much is said about the color of shoes worn by runaways. The few listings include a “pair of black shoes” (1768), “country made shoes not blacked “(1771 & 1775) and a pair of “white Shoes” (1774), hopefully not worn after Labor Day.


Closures:
Buckles show up the most often when closures are mentioned. If you couldn't afford buckles or had sold them for gin money though, don't worry! An “old Pair of Shoes tied with Rope Yarn” (1755), “shoes tied with leather strings” (1768 twice), “tied with strings” (1768, 1772 thrice) when leather strings weren't available, will work. There are shoes listed with “strings” (1768, 1775) or “having stings in his shoes” (1769, 1772), tied, or even “to tie” (1771) for those times when you haven't gotten around to actually tying them.

Can You Describe Them?
Are they a Pair of “neat stitched Pumps” (1771), “new or almost new” (1763), good, neat, plain shoes or old, poor, “coarse” (1772) or “coarse store shoes” (1770), only “pretty good” (1752), just “bad shoes” (1776) or worse, “very bad shoes” (1768). They could be a “little worn” (1775), “part worn” (1770), “half worn” (1763) or “pretty much wore” (1767).

Would you call them “thin” (1770) or are they “solid or strong thick, shoes” (1770), with “uncommonly thick soles” (1769)? They could be “handsome square toe'd Shoes” (1738) or “old square-toe'd Shoes” (1739) and not so handsome a year later. They could even be “peaked” (1768) or “half soled” (1772) if that's the way you like them.

Speaking of soles, shoes could be “hobb nailed” (1738), with “hobnails in their shoes” (1775), “nailed round with hob nails” (1769), “nailed all round both heels and soles” (1775) or just “with the heels nailed” (1767). You could have the “Soals (sic.) thick set with Hobnails” (1773) and the “bottoms very broad and nailed” (1771) or they could be just “small old shoes, with nails in the heels” (1774).

Who Made Them & Where?
Negro or “negro made” (1775 twice), Country-made, Common made or just common? “Store shoes” (1770, 1774) “such as are usually sold in Stores” (1772), “stout imported Shoes” (1773), English or English-made, “British made” (1774), “London made” (1775). They could be Virginia, “London Fall Shoes” (1745), “Glasgow coarse made Shoes” (1773), “Scotch Shoes new soled” (1750-1) and later just “Scotch shoes” (1771) once the soles break in a little.

What To Wear With Them?
The majority of folks mentioned wear shoes and stockings, while some unfortunate souls have neither shoes nor stockings, poor fellows. A few people have shoes without stockings but no one is mentioned wearing stockings and without shoes. How logical of them!

What About Bob?
One fellow named Bob (1774), “can make shoes, play on the fiddle and is fond of singing with it”, presumably not all at the same time though, while another fellow by the same name only “pretends to make shoes” (1767). Wonder if it is really the same guy and he got better at making shoes and picked up a hobby in the seven years between the ads?

Say What?
Sometimes you just can' describe them! There is a listing which includes “old shoes, turned pumps” (1775) and another for “either shoes or boots” (1774) in case you like a little more variety in your footwear. The “new black grain dogskin shoes” (1775), should be counted under leather, right? Meanwhile the “stitch down shoes “(1768), “sand shoes with uncommon thick soles” (1769) and “light Pair of Shoes with Straps” (1773), defy my ability to describe them. Suffice it to say, these guys weren't barefoot!

One listing even includes a horse with his “hind shoes feathered” (1774). After all, we wouldn't want to leave our four legged friends out.
***
Works Cited:

Virginia Center for Digital History. “Virginia Runaways,”
http://www2.uvawise.edu/runaways/ (April, 2011).

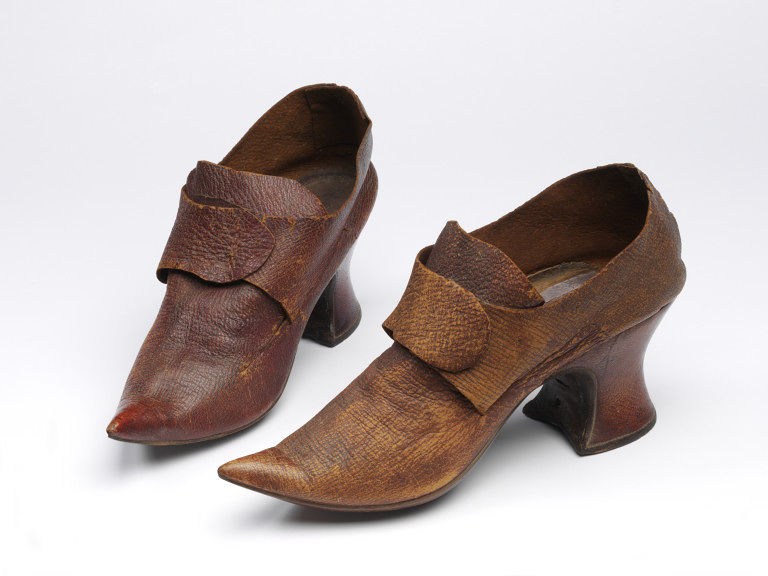
Shoe, leather, wood and linen thread, 1700. (Victoria and Albert Museum, London). http://collections.vam.ac.uk/

Childrens Shoes, leather, late 18th century. (Brooklyn Museum Costume Collection, The Metropolitan Museum of Art, New York). http://www.metmuseum.org/

Shoe, Silk damask, linen and leather, 1760-1770. (Colonial Williamsburg Collection, Williamsburg). http://www.history.org/History/museums/index.cfm

Labels: , , ,

Sunday, January 16, 2011

Whip it, Whip it Real Good!

Or directions for making whipped-rolled gathers, useful in many applications, chiefly fine sewing for ladies & children.

We have already discussed how to make a plain rolled hem. The next step from that simple hem finish, is to use it in-conjunction with another technique to produce fine gathers. These gathers can be found on the ruffles of men's fine shirts but most commonly, as the ruffles on day caps for women & young children.

Photos for this tutorial are coming soon! Had I been thinking ahead I would have taken the step by step photographs while finishing the ruffle on my newest Regency era day cap. I didn't. I am not, however, crazy enough to take it off & do all that work again just for a tutorial! Instead I'm working on another cap which I will will remember to photograph. Good thing I can never have too many caps.

To start, cut the piece you wish to gather. Finish 1 long and both short sides of this strip with a plain rolled hem. For ease, this will be called the "ruffle" for the rest of the tutorial.

Decide where you are going to attach your ruffle. This is happens to be the band of a mid-18th century French day cap.

Finish the hem edge of your attachment piece with another plain rolled hem. This is the piece that will remain flat & un-gathered once the ruffle piece is attached. Alternately you can finish this edge with a very narrow plain hem if the piece won't take a rolled hem neatly.

The next step is to begin whipping & gathering your ruffle piece to fit the attachment piece. This is two step process but time & patience will result in very nice little gathers.

First roll the unfinished edge of the ruffle with your fingers, as if starting yet another plain rolled hem. I know, groan.

However, instead of sewing a straight stitch & whip stitch combination as you would with a plain rolled hem, only sew a whip stitch over the finger rolled edge. I prefer this to go from the outside over to the interior for neatness.

This whip stitch needs to be a little wider than you would normally sew the rolled hem edge. When you have sewn a few whips, pull just enough to gather up the fabric. If your stitches are too closely spaced at this point, the fabric won't gather up & you'll end up with a ruffle-less ruffle. If that's the case, as it was for me the first (few) times I attempted these gathers, just snip off your starting knot, pull out your thread & start over, spacing your stitches a bit further apart, yet still even of course.

Continue down the entire length of your ruffle. Alternatively, if you run out of thread, or your ruffle piece is particularly long, you can separate the piece into sections. Just remember to leave nice long tails on your thread so that later we can adjust the gathering as needed.

Once your ruffle edge has been finished it's time to gather! Finally!

Start by pinning the short finished ends of your ruffle to the ends of your attachment piece or where ever the ruffle is to end. Make sure the finished sides are together.

Pull your loose threads, gathering up the ruffle until it fits the size of your un-gathered attachment piece. Adjust the gathers back & forth to make sure they are neatly balanced and not all concentrated at one end or the other. This is where using several threads can help on large pieces, making the adjustment of the gatherings easier to well, adjust. Pin like crazy.

The final step is to actually attach the ruffle to the attachment piece. To do this you simply whip stitch over every single one of those gathers, in the same places where you whip stitched over to create the gathers in the first place. I have found it easier to stitch with the gathered side facing me, that way I can easily get the needle between each of those gathers.

Crack open a beer, you're finished! No more rolled hems & endless whipped stitches on top of whipped stitches. Open out the two pieces, tugging slightly so that they lay flat & marvel at your handiwork. Vow to stick with pleats after all.

Labels: ,

Tuesday, November 16, 2010

Never hold anyone by the button, or the hand, in order to be heard out.


To keep myself busy while sitting in the seemingly endless hours of lecture each week, I have been working buttons. lots and lots of buttons!

Perfect for the cuffs and collar of your finest linen shirts or shifts, these solid thread buttons are sturdy yet never uncomfortably hard. As a bonus, they don't break, rust or wear away the sewing threads during the harsh laundry treatment 18th century underclothes frequently under go.

Labels: ,

Friday, May 14, 2010

“And the Spring comes slowly up this way.”

Things have been busy in my life recently, and while I have gotten a lot done in the past 4 months, sadly little of it has been reenacting oriented. Still, a few small projects always seem to creep in.

First was a very special project for a very special little girl. Unfortunately until she decides to join us the details will have to wait. Aren't I the worst kind of tease?

Second was the long awaited project of re-sizing one of L's linen gowns. A few years ago, when I had the time and the fabric to do so, I made L an "extra" gown. I sized it up from the blue wool gown she was just beginning to fit into with the intent that she would grow into the new gown, as kids tend to do. Unfortunately, I didn't take into account the way my child grows! I enlarged the gown in the length but also in the width. 2 years later and she still hadn't filled out in that width, although the length is now almost not enough. Just this past week I finally sat down & took out the excess size from the bodice, re-pleated & re-attached the skirt & added ties to the back. Now not only is there one less UFO* in my sewing room but L also has a second 18th C gown. Come summer when she returns to camp coated in mud, soaking wet & complaining, she will have something fresh to wear!

The third project on my list was a silk bonnet for L. She has light sensitivity & in modern life usually wears a baseball cap or sunglasses to shade her eyes while out of doors. In reenacting life neither of these was a viable solution. However, a brimmed bonnet is. On our trip to Minnesota last November L got to choose any fabric that she wanted from the silk department at SR Harris. She choose a very dark, almost black, navy blue silk taffeta. I decided to use the Kanniks Korner pattern for her bonnet strictly as a size guide. The instructions, well, anyone who's read this blog before knows that instructions are the first thing that I ignore. I did want this bonnet to be large enough that L could continue to wear it as she grows into adult sizes. I decided to use 2 layers of buckram & inexpensive floral wire in the brim to support the shape. The brim is also lightly lined with some scrap of dark blue wool. Unfortunately L has yet to wear the bonnet for more than a moment while fitting. What's a hard working mother to do? Why borrow the bonnet for herself of course!

The final project on my list has been the reorganization of all my research materials. When I first started reenacting I kept all my book lists and notes in a simple spiral notebook. However, this method hasn't worked out in the long run, especially as I collect more & more images to go along with my readings. Then when you add in the number of journal articles and books that are now available as digital copies through Google Books and EBSCO, my old fashioned notebook just wasn't enough. Over the past month I've gone through everything, sorted into relevant eras and specific categories, deleted any duplicates, double checked that every image has a date, author or at least location attached to it, made a database of all the books & articles I have read and those that I still need to read and best of all, loaded this wonderfully organized collection onto one flash drive. Now when ever I need anything, it is right there at my finger tips. What will I do with all this easy to find information? That, my friends, is another long term project that you all will have to wait & see!

*A UFO in sewing lingo is an "Unfinished Object" ie those projects that are half finished & waiting for the right time to be done.

Labels: , , ,

Saturday, April 10, 2010

Run like the Devil from the Excise Man


The latest addition to the C. Black Coffeehouse demonstration is this fine journal, hand made by Mr. P McClintock, the stationer. It will soon house 2 years worth of research on taxation & laws concerning the business of an 18th century coffeehouse, as well as the detailed accounts needed for the proper reporting of said business.

In preparation for this ledger, over the past 18 months I've been keeping waste-books, the preliminary stage in the so called "Italian style" of bookkeeping popular during the mid-18th Century. I've steadily been writing down various the "transactions" at events; who took so much coffee on Sunday, who I purchased ribbon from in exchange for a cup of tea, who promised to pay for that 1/4 pound of coffee and those newspapers, who owes so much in gambling &c. Now all that remains is translating the information into the new ledger, which I'm sure will require many more trips to my bookshelves to check that I'm following the proper format. While not necessarily difficult, I do find the act of bookkeeping to be daunting. So many steps, so many things to remember & above all, it has to be organized well for fear the King's Man might find something questionable!

Labels: ,

Sunday, March 29, 2009

Lucy Locket Lost Her Pocket

Or making a pair of embroidered pockets for a young girl.

I constructed this pair of pockets for my daughter L, who has grown enough in the past 3 years to need a larger pocket than the first I made. She also needs more room to carry her ever growing collection of 18th century trinkets.

The pockets are sized right between her original "small" pocket and the size I use for my own, measuring approximately 8" by 13". The front opening is 6 inches long, scientifically measured by having her lay her hand out on the pocket before cutting. The pockets themselves are made from 5oz linen, found in my scrap basket and dutch linen tape from Wm. Booth, Draper. The body binding was dyed using just a pinch of "baby blue" fiber reactive dye. Not a period choice, but what I had on hand and needed to use up anyway. Since my intention is for these pockets to last until L is a young woman I constructed them on 2 separate lengths of tape. This way they can tie both in the front & back, allowing the waistband to grow as she does.

The embroidery is worked on 5oz linen from my endless collection of scraps using the beautiful woad dyed wool from Renaissance Dyeing (available through Reconstructing History). I used these as a practice pieces, since embroidery is still a rather new hobby of mine. The design consists of stem stitch, back stitch, french knots, seed stitch & wrapped running stitch. I varied the colors used but kept the stitches the same in each piece. The finished work is them layered with the working portion of the pocket and bound around the edges. This protects the back of the embroidery & makes the pockets a little more durable. For my readers who have seen just how filthy L gets at events, it's pretty clear why they need the extra layers!

The embroidery design is not a historical recreation, just "historically inspired". I saw a similar design sometime last year while searching for 18th century motifs. Sadly, I can not remember where I initially found it. It was most likely one of the endless pile of library books. My one complaint is that her initials are so hard to embroider! After several tries I finally had to settle for an only slightly lopsided "W".

Up next, my (entirely) hand sewn shift!

Labels: , , , ,

Thursday, November 27, 2008

In One Autumnal Face

Just few little photo mosaics from a very successful photo shoot this past weekend. The gown shown is my 1770 era silk polonaise, affectionately dubbed the "Pretty Penny Gown". The matching hat & shoes were finished just in time for this years ONW/Colonial ball earlier this month. I'm wearing it over my standard underpinnings; red stomacher fronted stays, linen petticoat and cuffed linen shift. I did splurge and wear the delectable silk stockings from Spencer's Mercantile, which I received as a gift from my dear friend T. The outfit is accessorized with fresh water pearl drop earrings & matching necklace. Of course I couldn't dress up without including a few beauty marks. These are simple hearts, as I seem to have misplaced the tiny dancer I cut last year.

Photos are courtesy of my wonderful & talented friend A. I can't begin to thank her enough for braving the 35* weather with me (even though she had gloves!), chasing me around the gardens, making me laugh endlessly & most of all just being there to work on this project with me. She an extraordinary friend & I'm blessed to be the recipient of her talent.

All images were taken at Sinnissippi Gardens, a beautiful public garden and greenhouse in Rockford IL.

Labels: , , , ,

Tuesday, November 25, 2008

No Glove, No Love

From the Spence Collection at Bath.

Aren't these the most fantastic knitted mitts. I simply adore the pointed flap over the back of the hand. While the green mitts that I knitted myself are perfectly functional, I'd gladly trade them in for a pair that was even half as nice as these. Do you suppose if I started knitting them now, I'd have them finished by, oh, the tricentennial?


A pair of ladies’ knitted mittens, probably Italian, early 18th century, unlined, knitted in silk/cotton mix in fine stocking stitch, with large carnation and pomegranate repeats in yellow, white and green on a pink lilac/ground, 37 cm long.

Part of the Collection donated to the Livery in 1959 by the late Robert Spence.

Conservation 1995 – 1999 sponsored by Past Master Margaret Linton.

blog it

Labels: ,

Thursday, October 30, 2008

Rollin' Rollin' Rollin'

Or the deceptively simple technique for hand sewing a rolled hem on just about anything.

This technique has eluded me for nearly 2 years. I had tried everything I could think of to no avail. As it turns out, no ONE technique could fully do the trick. No wonder my rolled hems always seemed half done. They were!


1. Cut a nice straight square of fabric with no loose strings. Linen works best for your first project because it will easily hold the roll as you work.

2. Place fabric with the wrong side facing you.

3. Spit on your thumb and index finger. Hey, nobody said sewing was sanitary.


4. Place your fingers under the fabric, with your thumb on top. Use your thumb to gently pull edge towards you into a narrow roll. This is where that little bit of spit comes in handy. The moisture helps the fabric "take" to the roll. If you're lucky the material will hold the roll for it's full length. If not, simply do the thumb roll as you go.

Photobucket
5. Take a straight stitch into the body of the fabric, going towards the outside edge. This helps secure the thread & makes rolling at the edge easier.

Photobucket
6. Next, take a stitch *through* the roll from step 4, going towards the right side of the fabric.

Photobucket
7. Bring your working thread over the roll as you take a straight stitch into the body of the fabric again, this time going towards the far end of the piece.

8. Repeat stitching through the roll & body fabric for 2-3 stitches.

Photobucket
8a. Alternately, you can take both roll & body stitches at once, always ending with a stitch through the body fabric.

Photobucket
9. Gently pull the working thread towards the far end of the piece, holding the near end with your other hand. Do not however, pull to much or you will pucker the resulting hem.

Photobucket
10. Marvel as the hem rolls into itself!

11. Repeat for the full length of your project.

11a. To turn a corner, simply tie off & start the next side in the same way you started the first side. The very end of the first side will get rolled into the second side but that's OK. This gives your corners a neat finish.

Photobucket
12. Find all kinds of places to use a hand rolled hem. This happens to be a nice little handkerchief to keep in my pocket. Very useful for blowing your nose after taking snuff from Sanctuary Traders.

Photobucket
13. Embroider your monogram onto the wrong side of the handkerchief because it was 2AM ad you weren't paying attention.

14. Oh well, make another using your newly mastered hand sewn rolled hem stitching!

Labels: ,

Saturday, June 28, 2008

All the News That's Fit to Print

My current pet project for Black's Coffeehouse; newspapers.

18th Century coffeehouses were repositories of information, much of it in printed form, newspapers, broadsides, mail. True to that, I've been researching, reading, scanning, altering & printing historic newspapers for the visitors at Black's to enjoy. The initial response was exactly as I had hoped; people loved them. In fact, we did as I have read was done in period, we sat around in the coffeehouse reading bits out loud to each other (most still use the medial S, so the reader was frequently someone comfortable with the text), passing the pages back & forth, pointing out interesting advertisements & engaging in discussions about the news. They turned out to be the ideal fuel for first person interpretation and conversations.

I initially stared this research using the internet. The Virginia, Maryland & London Gazettes all host on-line archives of their historic papers. With a bit of Photoshop work & the industrial printer I was able to come up with several period approximate editions for the years our events revolve around. I have since focused on a single year for simplicity sake and because for all except one event we do, that year is appropriate.

However, those three papers were not enough to satisfy either Black's customers or myself. After all we taut that visitors can enjoy "the latest news from London & around the colonies". Through a bit of research and cross referencing I was able to make a small list of mid 18th century newspapers from New York, Pennsylvania, South Carolina, Massachusetts as well as another imported paper from London. But most importantly, all of these papers are archived on microfiche and available through Inter Library Loan courtesy of the State Historical Society . All that remains now is some dedicated time with the computer aided microfiche machine, flash drive and photo editing program.

I simply can't express the enjoyment that I am getting from this project. I find the period articles to be endlessly educational, the advertisements to be a wonderful glimpse into day to day lives and being able to share so much authentic "history" with friends and the public, well it just brings me countless joy. I am seriously considering further research into these papers and the information they contain. It seems a shame to have them so easily accessible and not do something extensive with them.

Labels: , , ,

Friday, March 07, 2008

June Cleaver in My Pocket

or, the 18th century housewife being a kit for sewing or storage of coin and not for use in washing of windows.

The term housewife, meaning a small wallet like object, often used as a sewing kit by women, seems to have come into use sometime during the 1730's. Housewives are useful things for the 18th century reenactor, perfect for practicing your hand sewing, an excellent use for those endless scraps of fabric & ideal for keeping modern items "hidden in plain sight".

Trial records from The Old Baily in London list numerous cases of theft and grand larceny involving "housewives" between 1730 & 1790. The first use of the term is during the robbery trial of Priscilla Scott in 1731. In addition to being put "in Fear of her Life" Mrs. Scott was also robbed of "a Snuff Box, value 10 s., a Silk Housewife, and six Shillings in Money". During the trial of Sarah Morgan in 1756 the constable from Kensington parish states he "found five shillings in silver in a housewife, put under her arm pit." In 1765, Spinster Eleanor Johnson was indited for theft thanks to "a housewife, in which there were two guineas and two half guineas". Later in 1767, thieves Elizabeth Merchant & Anne White were noted to have taken "money out of a housewife".

Robberies aren't the only period reference to housewives however. Newspaper advertisements from 1768-1770 often include housewives among other goods for sale. Catherine Rathell lists "housewives for ladies with instruments" in her advertisements in the Virginia Gazette from October 1768 to April 1769. Ms. Rathell's monopoly on housewives is supplanted by Sarah Pitt who lists "neat pincushion housewives with looking-glasses" in her Nov. 1770's Virginia Gazette ad.

Should you be neither a thief nor in the vicinity of the Ms.s Rathell & Pitt, your next option is to make your very own housewife.

1. Draw a pattern. This will come in handy if you plan on making more than one. Mine measures approximately 4" x 11", with a pointed end. Remember to add at least 1/4" seam allowance on all sides. The pointed tip is optional, I have seen them with both square or rounded ends as well.

housewife pattern

2. Divide the pattern into roughly 3 sections, or how ever many times you plan on folding the wallet. This will help when cutting pockets for the interior.

3. Cut out several layers from scrap fabric. I've chosen to use wool for the outer, a heavier linen inter lining & plain linen for the lining. You could use any combination of scrap fabrics, even being as fancy as Mrs. Scott above and make your housewife out of silk.

housewife layers

4. Cut out a selection of pockets. There is no limit to the style or number of pockets you choose. If making a housewife to hide modern items, such as a cell phone or drivers license, use those items to determine the size of your pockets. Otherwise use the divisions marked on the pattern in step 2, leaving a little space to allow the housewife to fold closed.

housewife pockets

5. Hem the open ends of the pockets as needed based on the type of fabric being used.

6. Lay your pockets onto the lining. Stitch them into place, leaving 1 side open for use. Alternately, if you'd like an attached pin cushion, stitch both the top and bottom sides closed, leaving only the sides open.

housewife step 1

7. Lay the lining on top of the inter lining & outer. Pin the fabric sandwich together for ease of binding as desired.

8. Lay tape or a long thin strip of scrap fabric along the outer edge. Stitch in place, turning corners carefully. Make sure to catch the sides of the pockets with the binding. If adding a pin cushion, be sure to stuff the pocket before catching both sides with the binding.

housewife binding 2

9. Turn the binding around the raw edge, pinning in place as needed. Stitch in place, turning corners carefully again.

housewife binding 3

10. Attach thin tape to the outside, near the pointed end. Leave one side of the tape longer than the other for ease of wrapping & tying closed. Alternately you could attach the tape to the point itself, wrapping & tying the housewife closed with a single end, rather than two.

housewife tie

11. Stuff your housewife with all manner of things, from sewing supplies to your cell phone, id & money. Fold up, wrap the tie around & knot securely. Successfully add one more period accoutrement to your collection.

housewife finished 1

Labels: , ,

Friday, February 22, 2008

What A Cat-astrophe

What a catastrophe!

I washed my beloved green mitts. Scrubbed them lovingly with my favorite handmade lye soap, wrung them out and draped them over the edge of the bathtub to dry. Later that day I went into the bathroom only to discover the above. One of my mitts had been eaten. Not by giant moths but by the furry monsters that call themselves my cats! Don't let the innocent looks fool you. These are cold hearted knitting killers!


Oh I was livid! The only positive to come out of this catastrophe, was that the mitt they destroyed was the first one, the one with the accidental yarn-overs, twisted stitches & other first time errors. Since no particular culprit was found at the scene of the crime, I accused both cats. Mr. Mistofelees attempted to kiss up by laying nicely on my lap as I diligently knitted a replacement mitt. Barley Mow chose to snuggle at my side while I slept, purring away.

The replacement mitt only took a day to complete, with no errors and surprisingly no need to back track for accidental yarn-overs. The thumb gusset took a bit of thought, since I've obviously forgotten how I did it the first two times. However, I now have two "good" mitts, a full pair. No more feeling the need to hide my hand or explain that one was my learner.

Still, I've moved the yarn basket to the top of my shelves, well out of the reach of the yarn eating monsters!

Labels:

Wednesday, December 12, 2007

Little Bits of Mitts

(insert a chorus of exuberant cheering here)

I finished my knitted fingerless mitts yesterday! I've been wearing them since, & I have to say, they are the best things around. I'm sitting here typing & my hands are actually too warm, when does that happen?

Thanks to sitting down and talking out how to insert the thumb with the General's Wife, it went rather smoothly. I did end up frogging down on the 2nd thumb about 2 rows thanks to an accidental yarn over but that was really all. I was determined to have at least 1 mitt that didn't have a huge visible error. Of course in both you can still see the line where I change from 1 needle to the next. It's not terribly obtrusive, but it's still there if you look. I'm not sure what to do about that. Is that just part of knitting in the round?I thought I was doing pretty well with keeping the first stitch tight in the transition.

Unlike the first mitt! That was the learner right? Because it certainly looks it! Can you tell in the pictures which is which? I am actually toying with either frogging all the way down to the first YO error or starting a third mitt just to have a "perfect" pair. By the time I got to the palm on the 1st, I had to do no less than 6 K2tog to get it back to the proper stitch count. Oi!

Still, I'm going to wear these for the Historic Holiday event this weekend. They are perfect for playing the mandolin without freezing my hands off. Plenty of space for my fingers to move, not to bulky in the palm, well fitted but flexible in the thumb and best of all, they are long enough (elbow length) to keep my bare forearms covered and warm!

I did learn something during this project. I prefer knitting in the round. I don't purl so well & like the look of a stockinette stitch best. The natural solution, knit in the round. No purl and yet you get a stockinette stitched item.

Next up on the needles, 18th century mittens from the Mara Riley pattern. Should they be in the yellow that the Generals Wife gave me, or the left over green? Should they be for myself or for L? Should I start them today or save them for this weekend? Should I contact the CDC about this infectious knitting disease?

Labels: ,

Sunday, November 04, 2007

Had a Ball, at the Ball

A quick wrap up of the ONW, Colonial Ball, which until I arrived last night, I had no idea were the same event. It was a nice surprise though, to see friends I wasn't expecting & to meet some new people.

Prior to the ball J, W, L & I headed over to the college to take advantage of their settings for some photographs. This is part of my new project of getting really good photos of all my clothing. Part of my goal is to have a large portfolio of photos for jurying into events, part is for posterity; 40 years from now I'll be able to look back & say "this is what I did etc" and part is for current sharing rights with my on-line friends.

Photo Sharing and Video Hosting at Photobucket

Photo Sharing and Video Hosting at Photobucket

Photo Sharing and Video Hosting at Photobucket

Photo Sharing and Video Hosting at Photobucket

Photo Sharing and Video Hosting at Photobucket

The last one is one of my favorites. I really liked all the ones we took inside but most of them weren't focused very well. Part trouble with the camera, part trouble with the lighting. The secret to that last picture is that I'm glaring at L for trying to make me laugh. I was having a very hard time keeping a straight face. There is something that's just not right about grinning like a Cheshire Cat while in 18th century clothes!

Labels: , , ,

Wednesday, October 31, 2007

Baby Got Back

or the modestly endowed ladies guide to enhancing her god given assets with a false rump.

Step 1: Collect you supplies

Sheet of tin foil, unused please.
Fabric. In this case, left over 6oz linen from lining the Hunting Coat

Photo Sharing and Video Hosting at Photobucket

Stuffing. Lots & lots of stuffing.
Sewing thread. In this case, linen of course.

Photo Sharing and Video Hosting at Photobucket

2 Waist Tapes. Enough to go around your waist and tie in the front. I ended up using slightly narrower than normal cotton tape since I seem to have run out of my standard 1/2" wide linen tape (again)

Step 2: The Tin Foil Form

Photo Sharing and Video Hosting at Photobucket

Form the tin foil into a long snake. Using your duct tape dummy, or yourself, bend the tin foil in a curve around your waist, just above you're "assets".

Step 3: The Pattern

Photo Sharing and Video Hosting at Photobucket

Carefully remove the tin foil pattern. Laying it on your 1/4 folded fabric. Trace the curve and sketch a similar lower curve to create the kidney shaped rump.

Photo Sharing and Video Hosting at Photobucket

Step 4: The Cutting

Cut out the pattern, remembering to leave extra for seam allowance. Be sure to get 2 full kidney shapes, one for the top and one for the bottom of the rump.

Step 5: The Sewing

Photo Sharing and Video Hosting at Photobucket

Leave both pieces together if they were cut together, or lay one piece on top of the other. Tuck one end of each waist tape between the layers at the point of the kidney shape. Start from slightly off center in the inner curve and sew around the shape until you reach a similar point on the opposite of the inner curve. Don't forget to leave an opening for turning & stuffing.

Step 6: The Flip & The Stuff

Flip the fabric right side out. Press if you are feeling particular. If not, begin stuffing. Start with the narrowest areas and stuff in small clumps until your rump feels nice & firm, like a strangely shaped pillow.

Step 7: Close It Up

Photo Sharing and Video Hosting at Photobucket

Pin the opening and carefully hand sew (blind or whip stitch works well) the opening closed.

Step 8: My Rumps

Photo Sharing and Video Hosting at Photobucket

Tie the rump underneith your outer petticoat. The extra padding tends to make the back side of the skirt higher. If you intend to wear a rump with a particular petticoat or gown on a regular basis, make the rear panel longer to compensate for the added size. Alternately, wait to hem your gown until wearing the rump to ensure proper length all around.

Photo Sharing and Video Hosting at Photobucket

Photo Sharing and Video Hosting at Photobucket

Step 9: The Jokes

Proceed to make as many jokes about "rumps" "back" "ass" etc while wearing what amounts to an 18th century travel pillow on your backside. Marvel at a time period where even JLo would need extra padding to pull off a fashionable silhouette.

**Seriously, apologies to my more sensitive readers for the butt jokes. J threatened to send them in as comments if I didn't title the post after his favorite Sir-Mix-A-Lot song. And honestly when you're hopped up on Halloween candy & sewing a false rump at midnight, everything is funny**

Labels: , , ,